The Perfect Stuffing Recipe for Your Holiday Feast
Stuffing, also known as dressing, is a quintessential dish that graces the tables of many during the holiday season. Whether you prefer a traditional recipe or a modern twist, stuffing adds a comforting and flavourful element to any festive meal. Here, we present a classic stuffing recipe that is sure to impress your guests.
Ingredients:
- 8 cups of cubed bread (preferably stale)
- 1 large onion, diced
- 3 stalks of celery, chopped
- 2 cloves of garlic, minced
- 1/2 cup of butter
- 1 teaspoon of dried sage
- 1 teaspoon of dried thyme
- Salt and pepper to taste
- 2 cups of chicken or vegetable broth
Instructions:
- Preheat your oven to 180°C (350°F).
- In a large pan, melt the butter over medium heat. Add the onion, celery, and garlic. Cook until softened.
- Add the sage and thyme to the pan. Season with salt and pepper.
- In a large mixing bowl, combine the cubed bread with the cooked vegetable mixture. Pour in the broth gradually until the bread is moistened but not soggy.
- Transfer the stuffing mixture into a baking dish. Cover with foil and bake for 30 minutes.
li>Remove the foil and bake for an additional 15-20 minutes until golden brown.
li>Your delicious stuffing is now ready to be served alongside your roast turkey or favourite holiday main course!
div>
pWhether you are hosting a festive gathering or simply craving a taste of tradition, this stuffing recipe is sure to delight your taste buds and warm your soul. Enjoy every bite of this classic dish that brings comfort and joy to any special occasion.
div>
Five Reasons Why Stuffing is the Perfect Addition to Your Holiday Feast
- Versatile dish that can be customised with various ingredients to suit different tastes.
- Adds a delicious and savoury element to any holiday meal.
- Great way to use up leftover bread, reducing food waste.
- Brings a sense of tradition and nostalgia to the dining table.
- Easy to prepare and can be made ahead of time, saving you valuable cooking time on the day of your feast.
Seven Drawbacks to Consider Before Making Traditional Stuffing from Scratch
- Requires time and effort to prepare from scratch.
- May be high in calories and fat due to butter content.
- Potential for the stuffing to become too soggy if not baked properly.
- Some people may have dietary restrictions that prevent them from enjoying traditional stuffing ingredients.
- Leftovers may not keep well and could lose their texture when reheated.
- Variations in taste preferences may lead to some guests not enjoying the flavour profile of the stuffing.
- Preparing stuffing alongside other dishes can be logistically challenging, requiring careful timing and coordination.
Versatile dish that can be customised with various ingredients to suit different tastes.
Stuffing is a versatile dish that offers endless possibilities for customization to cater to different tastes and preferences. Whether you prefer a traditional herb-infused stuffing or want to experiment with ingredients like dried fruits, nuts, or even spicy sausage, the beauty of stuffing lies in its adaptability. By adding your own unique twist to the recipe, you can create a stuffing that perfectly complements your main course and reflects your personal culinary style. The ability to tailor this classic dish to suit a variety of flavour profiles makes it a beloved favourite on many dining tables during festive occasions.
Adds a delicious and savoury element to any holiday meal.
The beauty of a well-prepared stuffing recipe lies in its ability to enhance the overall dining experience by adding a delicious and savoury element to any holiday meal. With its rich flavours and comforting textures, stuffing has the power to elevate a simple dish into a culinary delight that resonates with warmth and tradition. Whether served alongside roast turkey, baked ham, or as a standalone side dish, the addition of stuffing brings a depth of taste that truly embodies the spirit of festive feasting.
Great way to use up leftover bread, reducing food waste.
Using this stuffing recipe is a fantastic way to make use of leftover bread, thereby helping to reduce food waste. Instead of letting stale bread go to waste, you can transform it into a delicious and satisfying dish that adds depth and flavour to your holiday feast. By repurposing ingredients that might otherwise be discarded, you not only create a tasty addition to your meal but also contribute to more sustainable cooking practices. Embracing this pro of the stuffing recipe allows you to enjoy a hearty and comforting dish while being mindful of minimising food wastage in your kitchen.
Brings a sense of tradition and nostalgia to the dining table.
The beauty of a well-crafted stuffing recipe lies in its ability to evoke a sense of tradition and nostalgia at the dining table. With each spoonful of this comforting dish, one is transported back to cherished memories of family gatherings, festive celebrations, and the warmth of home-cooked meals shared with loved ones. The familiar aromas and flavours of stuffing not only fill the room but also fill our hearts with a deep sense of connection to the past, making every bite a reminder of the enduring traditions that bring us together year after year.
Easy to prepare and can be made ahead of time, saving you valuable cooking time on the day of your feast.
Preparing stuffing ahead of time offers a practical advantage, allowing you to efficiently manage your cooking schedule on the day of your feast. This pro of the stuffing recipe not only simplifies the meal preparation process but also ensures that you can focus on other dishes or enjoy more time with your loved ones during the holiday celebration. By making the stuffing in advance, you can alleviate last-minute stress in the kitchen and still serve a delicious and comforting side dish that complements your festive spread perfectly.
Requires time and effort to prepare from scratch.
Preparing stuffing from scratch can be a time-consuming and labour-intensive process. From gathering the ingredients to chopping and sautéing vegetables, mixing in herbs and seasonings, and ensuring the bread is perfectly moistened, making stuffing from scratch demands a significant investment of time and effort. However, for those who appreciate the art of homemade cooking and the satisfaction of creating a dish from start to finish, the end result is often well worth the dedication put into crafting a delicious and personalised stuffing recipe.
May be high in calories and fat due to butter content.
While stuffing is a beloved holiday dish that brings warmth and comfort to festive meals, it is important to be mindful of its potential drawbacks. One significant concern with traditional stuffing recipes is their high calorie and fat content, often attributed to the generous use of butter. While butter adds richness and flavour to the dish, excessive consumption can contribute to an increase in calorie intake and saturated fats. To enjoy stuffing in a healthier way, consider exploring alternative ingredients or cooking methods that reduce the overall calorie and fat content without compromising on taste.
Potential for the stuffing to become too soggy if not baked properly.
One potential downside of preparing stuffing is the risk of it becoming overly soggy if not baked properly. When the bread absorbs too much moisture from the broth or other liquid ingredients, the texture can become mushy and unappetising. To avoid this issue, it is essential to ensure that the bread cubes are adequately moistened without being drenched. Properly balancing the amount of liquid used and monitoring the baking time can help achieve a perfect consistency that is neither too dry nor too soggy, resulting in a delectable stuffing that complements your holiday meal beautifully.
Some people may have dietary restrictions that prevent them from enjoying traditional stuffing ingredients.
Some people may find it challenging to enjoy traditional stuffing due to dietary restrictions that limit their consumption of certain ingredients. For individuals with gluten intolerance, dairy allergies, or specific dietary preferences, the classic stuffing recipe containing bread and butter may not be suitable. However, with the growing awareness of various dietary needs, there are alternative recipes available that cater to different restrictions, ensuring that everyone can savour a delicious and satisfying stuffing dish tailored to their specific requirements.
Leftovers may not keep well and could lose their texture when reheated.
When considering the downside of a stuffing recipe, one potential con to keep in mind is that leftovers may not retain their original texture when reheated. Due to the nature of stuffing being a bread-based dish, reheating leftovers can sometimes result in a loss of moisture and a change in texture, potentially making the stuffing less appealing. It is important to store any leftover stuffing properly and consider creative ways to repurpose it to maintain its flavour and enjoy it to the fullest even after the initial serving.
Variations in taste preferences may lead to some guests not enjoying the flavour profile of the stuffing.
Variations in taste preferences can sometimes result in certain guests not fully appreciating the flavour profile of the stuffing. While some may relish the traditional blend of herbs and aromatics, others might prefer a different seasoning or texture. It’s important to consider the diverse palates of your guests when serving stuffing and perhaps offer alternative side dishes to cater to different tastes. Ultimately, embracing culinary diversity can enhance the dining experience and ensure that everyone finds something delicious to enjoy at the table.
Preparing stuffing alongside other dishes can be logistically challenging, requiring careful timing and coordination.
Preparing stuffing alongside other dishes can be logistically challenging, requiring careful timing and coordination. With various components needing attention simultaneously, such as chopping ingredients, sautéing vegetables, and baking the final dish, ensuring that everything comes together harmoniously can be quite a task. Juggling different cooking processes and timings to achieve a perfectly cooked stuffing while managing other elements of the meal demands precision and organization in the kitchen. Despite these challenges, the reward of serving a delicious stuffing that complements the main course makes the effort worthwhile.

The Perfect Scrambled Eggs Recipe
Scrambled eggs are a classic breakfast dish that is loved by many for its simplicity and deliciousness. With just a few basic ingredients and a little bit of technique, you can create the perfect scrambled eggs that are creamy, fluffy, and full of flavour.
Ingredients:
- 4 large eggs
- Salt and pepper to taste
- 1 tablespoon butter
- 2 tablespoons milk or cream (optional)
Instructions:
- Crack the eggs into a bowl and whisk them until well combined. Add salt, pepper, and milk or cream if using, and whisk again.
- Heat a non-stick pan over medium heat and add the butter. Allow it to melt and coat the bottom of the pan.
- Pour the egg mixture into the pan. Let it sit for a few seconds until the edges start to set.
- Using a spatula, gently stir the eggs from the edges towards the centre. Continue stirring occasionally until the eggs are mostly set but still slightly runny.
- Remove the pan from heat as the residual heat will continue to cook the eggs to perfection.
- Serve your scrambled eggs hot with toast, bacon, or your favourite breakfast sides.
Whether you like your scrambled eggs soft and creamy or well-cooked and fluffy, this recipe allows you to customise your dish to suit your preferences. Enjoy this simple yet satisfying breakfast treat any time of day!
Five Essential Tips for Perfectly Fluffy Scrambled Eggs
- Whisk the eggs thoroughly before cooking to ensure a light and fluffy texture.
- Add a splash of milk or cream to the beaten eggs for extra creaminess.
- Cook the scrambled eggs over low heat to prevent them from becoming rubbery.
- Season with salt and pepper towards the end of cooking to avoid drawing out moisture from the eggs.
- For added flavour, consider mixing in ingredients like cheese, herbs, or cooked vegetables.
Whisk the eggs thoroughly before cooking to ensure a light and fluffy texture.
To achieve a light and fluffy texture in your scrambled eggs, it is essential to whisk the eggs thoroughly before cooking. Whisking the eggs not only helps to incorporate air into the mixture but also ensures a uniform consistency, resulting in eggs that are tender and airy. This simple yet crucial step can elevate your scrambled eggs from ordinary to extraordinary, making them a delightful addition to any breakfast spread.
For an extra touch of creaminess in your scrambled eggs, consider adding a splash of milk or cream to the beaten eggs before cooking. This simple tip helps create a silkier texture and enhances the overall richness of the dish. The addition of milk or cream brings a subtle depth of flavour to the eggs, making them even more decadent and satisfying. Give this trick a try to elevate your scrambled eggs to a whole new level of deliciousness.
Cook the scrambled eggs over low heat to prevent them from becoming rubbery.
To ensure that your scrambled eggs turn out perfectly creamy and fluffy, it’s important to cook them over low heat. This gentle cooking method helps prevent the eggs from becoming rubbery and overcooked. By taking your time and cooking the eggs slowly, you can achieve a velvety texture that melts in your mouth. Low heat allows the eggs to cook evenly and retain their moisture, resulting in a delicious breakfast dish that is sure to impress.
Season with salt and pepper towards the end of cooking to avoid drawing out moisture from the eggs.
For the perfect scrambled eggs, a key tip is to season with salt and pepper towards the end of cooking rather than at the beginning. This technique helps to prevent the eggs from releasing excess moisture, resulting in a creamier and more flavourful dish. By waiting until the end to add seasoning, you can ensure that your scrambled eggs are cooked to perfection without becoming watery.
For added flavour, consider mixing in ingredients like cheese, herbs, or cooked vegetables.
To elevate the flavour of your scrambled eggs, consider incorporating additional ingredients such as cheese, herbs, or cooked vegetables. Adding a sprinkle of grated cheese like cheddar or feta can bring a rich and savoury dimension to your eggs. Fresh herbs like chives, parsley, or dill can impart a burst of freshness and aroma. For a nutritious twist, mix in sautéed vegetables such as bell peppers, spinach, or mushrooms to add texture and depth to your scrambled eggs. Experimenting with these extra elements can take your breakfast dish to a whole new level of taste and enjoyment.
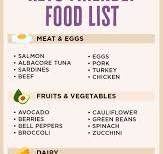
The Ultimate Guide to a Keto Meal Plan
Following a ketogenic diet can be a great way to achieve weight loss and improve overall health. A keto meal plan focuses on high-fat, moderate-protein, and low-carb foods to put your body in a state of ketosis, where it burns fat for energy instead of carbohydrates.
Benefits of a Keto Meal Plan
Weight Loss: By reducing carb intake, your body switches to burning fat for fuel, leading to effective weight loss.
Improved Energy Levels: Ketones produced during ketosis provide a steady source of energy, avoiding the energy crashes associated with high-carb diets.
Better Mental Clarity: Many people report improved focus and mental clarity when following a keto meal plan.
Sample Keto Meal Plan
Breakfast: Scrambled eggs cooked in butter with avocado slices.
Lunch: Grilled chicken salad with olive oil dressing and feta cheese.
Snack: Handful of almonds or celery sticks with cream cheese.
Dinner: Baked salmon with asparagus sautéed in coconut oil.
Tips for Success
- Adequate Hydration: Drink plenty of water to stay hydrated and support digestion.
- Moderate Protein Intake: Ensure your protein intake is moderate to avoid hindering ketosis.
- Incorporate Healthy Fats: Include sources of healthy fats like avocados, nuts, and olive oil in your meals.
- Avoid Processed Foods: Stick to whole, unprocessed foods to maximise the benefits of the keto diet.
Remember that consulting with a healthcare professional or nutritionist before starting any new diet plan is always recommended. With dedication and proper planning, a keto meal plan can help you achieve your health goals effectively.
9 Essential Tips for Crafting a Successful Keto Meal Plan
- Focus on consuming high-fat foods like avocados, nuts, and seeds.
- Limit your intake of carbohydrates, especially from sources like bread, pasta, and sugary foods.
- Include a moderate amount of protein in your meals from sources like meat, fish, and tofu.
- Opt for healthy fats such as olive oil, coconut oil, and butter in cooking.
- Incorporate low-carb vegetables like spinach, broccoli, and cauliflower into your dishes.
- Stay hydrated by drinking plenty of water throughout the day.
- Plan your meals in advance to ensure you have keto-friendly options available.
- Monitor your nutrient intake to avoid any deficiencies while on a keto diet.
- Consult with a healthcare professional before starting a keto meal plan if you have any health concerns.
Focus on consuming high-fat foods like avocados, nuts, and seeds.
When following a keto meal plan, it is essential to focus on consuming high-fat foods such as avocados, nuts, and seeds. These nutrient-dense foods not only provide the necessary fats to support ketosis but also offer a variety of vitamins, minerals, and antioxidants that are beneficial for overall health. Incorporating avocados, nuts, and seeds into your meals can help you feel satiated and satisfied while reaping the benefits of a ketogenic diet.
Limit your intake of carbohydrates, especially from sources like bread, pasta, and sugary foods.
When following a keto meal plan, it is crucial to limit your intake of carbohydrates, particularly from sources such as bread, pasta, and sugary foods. These high-carb items can hinder the process of ketosis, where the body switches to burning fat for energy. By reducing consumption of these foods and focusing on high-fat and low-carb options, you can effectively maintain ketosis and reap the benefits of a ketogenic diet.
Include a moderate amount of protein in your meals from sources like meat, fish, and tofu.
To optimise the effectiveness of your keto meal plan, it is essential to include a moderate amount of protein in your meals sourced from options such as meat, fish, and tofu. Protein plays a crucial role in maintaining muscle mass and supporting overall health while following a ketogenic diet. By incorporating these protein-rich foods into your meals, you can ensure that your body receives the necessary nutrients for sustained energy levels and optimal functioning.
Opt for healthy fats such as olive oil, coconut oil, and butter in cooking.
When following a keto meal plan, it is essential to opt for healthy fats like olive oil, coconut oil, and butter in your cooking. These sources of fats not only add flavour to your meals but also provide the necessary fuel for your body during ketosis. By incorporating these healthy fats into your cooking, you can support your weight loss goals and promote overall well-being on a ketogenic diet.
Incorporate low-carb vegetables like spinach, broccoli, and cauliflower into your dishes.
Incorporating low-carb vegetables such as spinach, broccoli, and cauliflower into your dishes is a smart way to add essential nutrients while keeping your carb intake in check on a keto meal plan. These vegetables not only provide vitamins and minerals but also contribute to the overall flavour and texture of your meals. By including a variety of nutrient-dense veggies, you can create satisfying and balanced keto-friendly dishes that support your health goals.
Stay hydrated by drinking plenty of water throughout the day.
Staying hydrated is a crucial aspect of a successful keto meal plan. By drinking plenty of water throughout the day, you not only support your body’s overall hydration needs but also aid in digestion and the process of ketosis. Water helps to flush out toxins, regulate body temperature, and maintain optimal bodily functions. Ensuring adequate hydration can also help prevent common side effects such as headaches and fatigue that may occur when transitioning to a ketogenic diet. Remember to make water your go-to beverage choice to stay on track with your keto journey and promote overall well-being.
Plan your meals in advance to ensure you have keto-friendly options available.
Planning your meals in advance is a crucial tip for successfully following a keto meal plan. By preparing and organising your meals ahead of time, you can ensure that you always have keto-friendly options available when hunger strikes. This approach helps you avoid impulsive food choices and makes it easier to stay on track with your dietary goals. Whether it’s meal prepping for the week or simply planning out your daily menu, taking the time to strategise your meals can set you up for success on your keto journey.
Monitor your nutrient intake to avoid any deficiencies while on a keto diet.
It is crucial to monitor your nutrient intake carefully when following a keto meal plan to prevent any potential deficiencies. Since the diet restricts certain food groups, such as high-carb fruits and grains, it’s important to ensure you are getting essential vitamins and minerals from other sources. Incorporating a variety of nutrient-dense foods like leafy greens, nuts, and seeds can help maintain a balanced diet and support overall health while on a ketogenic regimen.
Consult with a healthcare professional before starting a keto meal plan if you have any health concerns.
It is crucial to consult with a healthcare professional before embarking on a keto meal plan, especially if you have any underlying health concerns. Seeking guidance from a doctor or nutritionist can help ensure that the diet is safe and suitable for your individual needs. They can provide valuable insights and recommendations tailored to your health status, helping you approach the keto meal plan in a way that promotes both weight loss and overall well-being.