Traditional Apple Pie Recipe: A Taste of Home

apple pie recipe

Delicious Apple Pie Recipe

Delicious Apple Pie Recipe

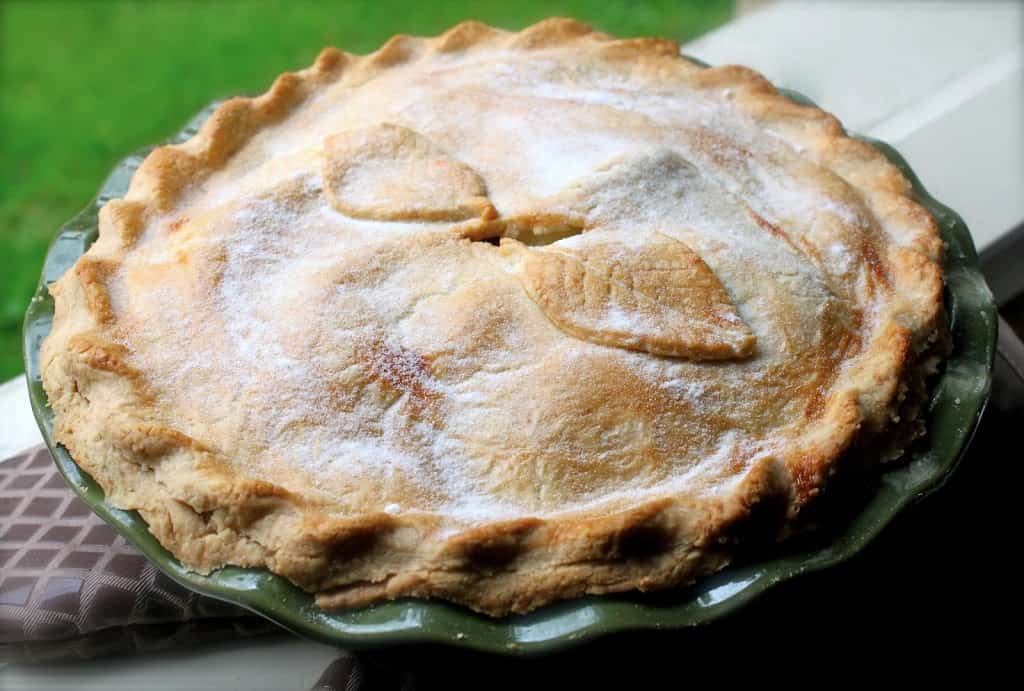
If you’re looking for a classic dessert that never fails to please, then an apple pie is the perfect choice. With its buttery crust and sweet, cinnamon-spiced apple filling, this homemade treat is sure to become a family favourite.

Ingredients:

  • 6-7 medium-sized apples, peeled and sliced
  • 1 cup sugar
  • 2 tablespoons all-purpose flour
  • 1 teaspoon ground cinnamon
  • 1/4 teaspoon salt
  • 1 tablespoon lemon juice
  • Pastry for a double-crust pie (store-bought or homemade)
  • 2 tablespoons butter, cut into small pieces

Instructions:

  1. Preheat your oven to 200°C (400°F).
  2. In a large bowl, combine the sliced apples, sugar, flour, cinnamon, salt, and lemon juice. Toss until the apples are evenly coated.
  3. Roll out half of the pastry and line a 9-inch pie dish with it. Trim any excess dough hanging over the edges.
  4. Pour the apple mixture into the pastry-lined dish and dot with butter pieces.

  • Roll out the remaining pastry and place it over the apple filling. Trim and crimp the edges to seal the pie.

  • Cut slits in the top crust to allow steam to escape during baking.

  • Bake in the preheated oven for 45-50 minutes or until the crust is golden brown and the filling is bubbly.

  • Allow the pie to cool slightly before serving. Enjoy your delicious homemade apple pie!

  • .


    Essential Tips and Tricks for Perfecting Your Apple Pie Recipe

    1. 1. How do I make a homemade apple pie crust?
    2. 2. What are the best apples to use for apple pie?
    3. 3. Can I add other fruits to my apple pie filling?
    4. 4. How do I prevent my apple pie from becoming too watery?
    5. 5. Can I make an apple pie in advance and freeze it?
    6. 6. Is it necessary to peel the apples before making the pie?
    7. 7. What is the ideal thickness for rolling out the pastry for an apple pie?
    8. 8. Are there any alternative ingredients that can be used to replace sugar in the recipe?

    1. How do I make a homemade apple pie crust?

    For those wondering how to make a homemade apple pie crust, it’s easier than you think! To start, combine flour, salt, and cold butter in a bowl, then use a pastry cutter or your fingertips to blend the mixture until it resembles coarse crumbs. Gradually add ice water and mix until the dough comes together. Divide the dough into two portions, shape them into discs, wrap in plastic wrap, and chill in the fridge for at least an hour. When ready to use, roll out one disc for the bottom crust, fill with your apple pie filling, then cover with the second rolled-out disc for the top crust. Trim and crimp the edges before baking to golden perfection. Enjoy your delicious homemade apple pie with a flaky and buttery crust!

    2. What are the best apples to use for apple pie?

    When it comes to making the perfect apple pie, choosing the right apples is crucial to achieving a delicious outcome. The best apples for apple pie are those that strike a balance between sweet and tart flavours and hold their shape well during baking. Popular choices include Granny Smith apples for their tartness, Honeycrisp for their sweetness, and Jonagold for a combination of both. Experimenting with a mix of different apple varieties can also add depth to the flavour profile of your pie, ensuring a harmonious blend of tastes in every bite.

    3. Can I add other fruits to my apple pie filling?

    When it comes to making apple pie, the question of adding other fruits to the filling often arises. While traditional apple pie recipes typically focus on the delicious combination of apples, sugar, and spices, some adventurous bakers like to experiment with adding other fruits for a unique twist. Popular choices include berries like raspberries or blueberries, which can add a tart sweetness to complement the apples. Pears or peaches are also excellent options that can enhance the overall flavour profile of the pie. Ultimately, the decision to add other fruits comes down to personal preference and creativity in the kitchen.

    4. How do I prevent my apple pie from becoming too watery?

    To prevent your apple pie from becoming too watery, it is essential to take a few key steps during the preparation process. One effective method is to pre-cook the apples slightly before assembling the pie. This helps to release some of the moisture from the fruit, reducing the chances of a soggy bottom crust. Additionally, incorporating a thickening agent like flour or cornstarch into the apple filling can help absorb excess liquid and create a more stable consistency. Lastly, ensuring that there are proper vents or slits in the top crust allows steam to escape during baking, preventing condensation and potential sogginess. By following these tips, you can enjoy a perfectly balanced and delicious apple pie with a crisp crust and flavourful filling.

    5. Can I make an apple pie in advance and freeze it?

    Yes, you can make an apple pie in advance and freeze it for later. To freeze an apple pie, assemble the pie as usual but do not bake it. Instead, wrap the unbaked pie tightly in plastic wrap or aluminum foil to prevent freezer burn. You can then store the wrapped pie in the freezer for up to 4-6 months. When you’re ready to bake the frozen pie, simply place it in a preheated oven and add a few extra minutes to the baking time to ensure that the filling is cooked through. Freezing an apple pie is a convenient way to have a homemade dessert on hand whenever you need it.

    6. Is it necessary to peel the apples before making the pie?

    When preparing an apple pie, whether or not to peel the apples is a matter of personal preference. While some recipes call for peeled apples to achieve a smoother texture in the filling, leaving the peels on can add a rustic appearance and extra nutrients to the pie. The decision to peel or not to peel ultimately depends on your desired taste and texture for the final dish.

    7. What is the ideal thickness for rolling out the pastry for an apple pie?

    When it comes to rolling out pastry for an apple pie, the ideal thickness plays a crucial role in achieving the perfect balance between a flaky crust and a well-cooked filling. Generally, aiming for a thickness of around 1/8 to 1/4 inch (3-6 mm) is recommended. This thickness allows the pastry to hold its shape while baking, ensuring that it is sturdy enough to support the juicy apple filling yet remains tender and delicious. It’s important to roll out the pastry evenly to maintain consistency throughout the pie and create a harmonious texture with each bite.

    8. Are there any alternative ingredients that can be used to replace sugar in the recipe?

    For those looking to reduce their sugar intake or explore alternative sweeteners, there are several options that can be used as substitutes in an apple pie recipe. One popular choice is to use honey or maple syrup as a natural sweetener, adding a unique flavour profile to the dessert. Another option is to opt for a sugar substitute like stevia or erythritol for a lower-calorie alternative. Experimenting with different sweeteners can provide a healthier twist to the traditional apple pie while still maintaining its delicious taste and appeal.

    The Essence of Sushi Rice: A Culinary Journey Through Japan’s Finest Grain

    sushi rice

    The Art of Sushi Rice: A Culinary Masterpiece

    Sushi, a beloved Japanese delicacy, is not just about fresh fish and colourful toppings. At the heart of every sushi roll lies a crucial element that often goes unnoticed but plays a pivotal role in the overall taste and texture – sushi rice.

    Sushi rice, also known as shari or sumeshi, is more than just steamed rice. It is a carefully crafted blend of short-grain Japanese rice, vinegar, sugar, and salt. The art of making sushi rice involves precise measurements and meticulous technique to achieve the perfect balance of flavours.

    What sets sushi rice apart from regular steamed rice is its seasoning. The combination of vinegar, sugar, and salt not only enhances the taste but also gives the rice its characteristic glossy sheen and sticky texture that holds the sushi roll together.

    When preparing sushi rice, it is essential to use high-quality Japanese short-grain rice known for its sticky consistency when cooked. The rice is rinsed multiple times to remove excess starch before being cooked in water. Once cooked, it is seasoned with a mixture of rice vinegar, sugar, and salt while still hot.

    The seasoned sushi rice serves as the foundation for various types of sushi – from nigiri (hand-pressed sushi) to maki (sushi rolls). Its subtle tanginess complements the fresh seafood or other toppings placed on top, creating a harmonious blend of flavours with each bite.

    In Japanese culinary tradition, mastering the art of sushi rice is considered a mark of skill and expertise. Sushi chefs spend years honing their craft to achieve the perfect balance of flavours and textures that elevate each bite into a culinary masterpiece.

    Next time you savour a piece of sushi, take a moment to appreciate the humble yet essential ingredient that binds it all together – the meticulously prepared sushi rice.


    The Benefits of Sushi Rice: Texture, Flavour, Versatility, and Culinary Artistry

    1. Sushi rice has a sticky texture that holds the sushi roll together, making it easy to eat.
    2. The seasoning of sushi rice with vinegar, sugar, and salt adds a delightful tangy flavour to each bite.
    3. High-quality Japanese short-grain rice used for sushi rice is known for its excellent stickiness when cooked.
    4. Sushi rice is versatile and serves as the base for various types of sushi, from nigiri to maki rolls.
    5. The glossy sheen of sushi rice enhances the visual appeal of sushi dishes.
    6. Mastering the art of preparing sushi rice showcases culinary skill and attention to detail.


    Considerations When Eating Sushi Rice: High Carbohydrates, Calorie Density, and Allergen Risks

    1. High in Carbohydrates
    2. Calorie Dense
    3. Potential Allergen

    Sushi rice has a sticky texture that holds the sushi roll together, making it easy to eat.

    The sticky texture of sushi rice is a key advantage that enhances the overall dining experience. By holding the sushi roll together effectively, this unique characteristic makes it effortless and enjoyable to eat. The cohesive nature of sushi rice ensures that each bite maintains its form, allowing diners to relish the flavours and textures without worrying about the roll falling apart. This practical aspect adds to the appeal of sushi as a convenient and satisfying culinary choice for those seeking a seamless dining experience.

    The seasoning of sushi rice with vinegar, sugar, and salt adds a delightful tangy flavour to each bite.

    The artful seasoning of sushi rice with a blend of vinegar, sugar, and salt introduces a delightful tangy essence to every bite. This harmonious combination not only enhances the overall taste of the sushi but also contributes to its unique character, offering a refreshing and nuanced flavour profile that complements the fresh ingredients and elevates the dining experience.

    High-quality Japanese short-grain rice used for sushi rice is known for its excellent stickiness when cooked.

    High-quality Japanese short-grain rice, favoured for sushi rice preparation, boasts a remarkable stickiness once cooked. This unique characteristic of the rice variety plays a vital role in the art of sushi-making, as it enables the grains to bind together seamlessly, creating the perfect texture for sushi rolls and nigiri. The inherent stickiness of this rice variety not only enhances the structural integrity of the sushi but also contributes to the overall dining experience by ensuring that each bite is cohesive and satisfying.

    Sushi rice is versatile and serves as the base for various types of sushi, from nigiri to maki rolls.

    Sushi rice’s versatility shines as it serves as the fundamental component for a wide array of sushi creations, ranging from traditional nigiri to popular maki rolls. Its sticky texture and subtly seasoned flavour make it the perfect canvas for showcasing an assortment of fresh toppings and fillings, allowing for endless creativity in crafting diverse sushi dishes. Whether elegantly hand-pressed into nigiri or tightly rolled into colourful maki rolls, sushi rice’s adaptability and ability to harmonize with different ingredients truly make it a cornerstone of Japanese culinary artistry.

    The glossy sheen of sushi rice enhances the visual appeal of sushi dishes.

    The glossy sheen of sushi rice serves as more than just a visual enhancement to sushi dishes; it is a testament to the meticulous preparation and skilled craftsmanship involved in creating these culinary delights. This lustrous finish not only adds an element of sophistication to the presentation but also signals the quality and attention to detail that goes into every sushi roll. The shiny appearance of the rice entices diners, inviting them to indulge in a sensory experience that is not only delicious but visually captivating as well.

    Mastering the art of preparing sushi rice showcases culinary skill and attention to detail.

    Mastering the art of preparing sushi rice showcases culinary skill and attention to detail. The precision required in measuring the ingredients, the delicate balance of vinegar, sugar, and salt, and the meticulous technique of cooking and seasoning the rice all demonstrate a chef’s dedication to their craft. The ability to create perfectly seasoned sushi rice not only enhances the overall flavour profile of sushi dishes but also reflects a deep understanding of Japanese culinary traditions. Attention to detail in every step of the rice preparation process is essential to ensure that each grain is infused with just the right amount of flavour, resulting in a harmonious blend that elevates the entire sushi dining experience.

    High in Carbohydrates

    One drawback of sushi rice is its high carbohydrate content, making it a less ideal choice for individuals adhering to low-carb diets. The combination of rice, vinegar, sugar, and salt used in sushi rice results in a significant carbohydrate load per serving. For those watching their carb intake, opting for alternatives like cauliflower rice or seaweed wraps can provide a lower-carb option while still enjoying the flavours of sushi. It’s important for individuals mindful of their carbohydrate consumption to consider the impact of sushi rice on their dietary preferences and make informed choices accordingly.

    Calorie Dense

    One drawback of sushi rice is its calorie density. The addition of sugar in the seasoning process can significantly increase the calorie content of the rice. Consuming sushi rice excessively may contribute to weight gain, as the extra calories from the sugar can add up quickly. It’s important for individuals mindful of their calorie intake to be aware of this aspect when enjoying sushi, and to practice moderation to maintain a balanced diet.

    Potential Allergen

    For some individuals, sushi rice may pose a potential con as it contains ingredients that could trigger allergic reactions. The seasoning of sushi rice often includes vinegar, which can be problematic for those with vinegar allergies. Additionally, certain types of rice used in sushi preparation may also be allergenic to some individuals. These allergens have the potential to cause adverse reactions in sensitive individuals, highlighting the importance of being mindful of ingredient choices when enjoying sushi dishes.

    Indulge in Irresistible Cookie Recipes: A Sweet Symphony of Flavours

    cookie recipes

    The Ultimate Guide to Delicious Cookie Recipes

    Who can resist the temptation of a freshly baked cookie? Whether you’re a fan of classic chocolate chip or enjoy experimenting with unique flavours, there’s a cookie recipe out there for everyone. In this article, we’ll explore some mouth-watering cookie recipes that are sure to satisfy your sweet tooth.

    Classic Chocolate Chip Cookies

    Start with a buttery dough mixed with chocolate chips for the perfect balance of sweet and savoury. Bake until golden brown for a crispy exterior and gooey centre.

    Oatmeal Raisin Cookies

    Add oats and raisins to your cookie dough for a hearty and wholesome treat. The chewy texture and hint of cinnamon make these cookies a comforting delight.

    Peanut Butter Cookies

    If you’re a peanut butter lover, these cookies are a must-try. With a rich peanut flavour and crumbly texture, they are simply irresistible.

    White Chocolate Macadamia Nut Cookies

    Elevate your cookie game with this decadent combination of white chocolate chips and crunchy macadamia nuts. Each bite is a symphony of flavours and textures.

    Vegan Almond Butter Cookies

    For those following a vegan lifestyle, these almond butter cookies are the perfect choice. They are soft, chewy, and packed with nutty goodness.

    Whether you’re baking for yourself or sharing with loved ones, these cookie recipes are guaranteed to bring joy to any occasion. So preheat your oven, gather your ingredients, and let the baking begin!

    Enjoyed these recipes? Explore more delightful treats on our website!

    Contact us at: [email protected]


    Top Cookie Recipe FAQs: Simple Ingredients, Easiest Bakes, and Popular Favourites

    1. How to make a 5 ingredient cookie?
    2. What are the easiest cookies to make?
    3. What is the number one homemade cookie?
    4. What are the 10 most popular homemade cookies?

    Creating a delicious 5-ingredient cookie is simpler than you might think. Start with a basic cookie dough base consisting of flour, butter, sugar, and eggs. Then, add your choice of fifth ingredient to enhance the flavour profile – whether it’s chocolate chips, nuts, dried fruit, or a hint of spice. By keeping the recipe minimalistic yet versatile, you can effortlessly whip up a batch of scrumptious cookies with just a handful of key ingredients.

    What are the easiest cookies to make?

    When it comes to easy-to-make cookies, there are a few classic recipes that stand out for their simplicity and delicious results. One of the easiest cookies to make is the classic shortbread cookie, which requires just a few basic ingredients like butter, sugar, and flour. Another popular choice is the peanut butter cookie, known for its minimal ingredient list and quick preparation. For those looking for a healthy option, oatmeal cookies are a great choice as they come together quickly and can be customised with various add-ins like raisins or nuts. These straightforward recipes are perfect for beginners or anyone looking to whip up a batch of homemade cookies in no time.

    When it comes to the title of the number one homemade cookie, opinions may vary among baking enthusiasts. However, one classic contender that often claims the top spot is the beloved chocolate chip cookie. Its winning combination of buttery dough and gooey chocolate chips has made it a timeless favourite for many. Whether enjoyed warm from the oven or dunked in a glass of milk, the chocolate chip cookie continues to hold a special place in the hearts (and stomachs) of cookie lovers worldwide.

    When it comes to homemade cookies, there are certain classics that have stood the test of time and continue to be beloved by many. The 10 most popular homemade cookies include the iconic chocolate chip cookies, comforting oatmeal raisin cookies, indulgent peanut butter cookies, delightful sugar cookies, rich and fudgy brownies, traditional shortbread cookies, festive gingerbread cookies, buttery snickerdoodles, chewy double chocolate cookies, and fragrant almond biscotti. These timeless favourites cater to a variety of tastes and preferences, making them go-to choices for baking enthusiasts looking to create delicious treats at home.

    Indulge in the Timeless Charm of Sponge Cake Delight

    sponge cake

    The Delightful Fluffiness of Sponge Cake

    When it comes to light, airy, and utterly delicious cakes, few can rival the classic sponge cake. This beloved dessert has been a staple in baking for centuries, enchanting taste buds with its delicate texture and versatility.

    What sets sponge cake apart is its unique method of preparation. Unlike butter cakes that rely on creaming butter and sugar together, sponge cake achieves its airy consistency through the incorporation of whipped eggs. This process creates a tender crumb that practically melts in your mouth with each bite.

    One of the key characteristics of a well-made sponge cake is its ability to absorb flavours effortlessly. Whether paired with fresh berries and cream for a summery treat or layered with rich chocolate ganache for a decadent dessert, sponge cake serves as a blank canvas for a myriad of flavour combinations.

    Despite its simplicity in ingredients – typically just eggs, sugar, flour, and sometimes a hint of vanilla – mastering the art of baking the perfect sponge cake requires precision and care. From gently folding in the flour to ensuring the eggs are whipped to just the right consistency, every step plays a crucial role in achieving that sought-after lightness.

    Whether enjoyed on its own with a dusting of icing sugar or as part of an elaborate celebration cake, sponge cake never fails to captivate with its fluffy allure. So next time you crave a slice of pure indulgence, look no further than this timeless classic that continues to reign supreme in the world of baking.


    Essential Guide to Sponge Cake: FAQs on Types, Recipes, and Techniques

    1. What are the 4 types of sponge cakes?
    2. How do I make a simple sponge cake?
    3. What is the difference between cake and sponge cake?
    4. What are the ingredients of sponge cake?
    5. What is sponge cake called in America?
    6. What are the 4 types of cake?
    7. What is the secret to a good sponge cake?
    8. How to make a very moist sponge cake?

    What are the 4 types of sponge cakes?

    In the realm of baking, the question of the four types of sponge cakes often arises, sparking curiosity among both novice and seasoned bakers. The four main variations include the classic Victoria sponge, known for its simplicity and versatility; the airy genoise sponge, favoured for its lightness and suitability for layered cakes; the rich chiffon sponge, celebrated for its moist texture and use of oil instead of butter; and the indulgent devil’s food sponge, characterised by its deep chocolate flavour and dense crumb. Each type offers a unique baking experience, showcasing the diverse possibilities that this beloved dessert has to offer.

    How do I make a simple sponge cake?

    Creating a simple sponge cake is a delightful journey that begins with just a few basic ingredients and a touch of culinary finesse. To embark on this baking adventure, start by whisking together eggs and sugar until they form a light and fluffy mixture. Gradually fold in sifted flour, being careful not to overmix to preserve the cake’s airy texture. Pour the batter into a prepared cake tin and bake in a preheated oven until the cake rises beautifully and turns golden brown. Once cooled, dust with icing sugar or adorn with your favourite toppings for a delicious treat that embodies the essence of homemade goodness.

    What is the difference between cake and sponge cake?

    When exploring the distinction between cake and sponge cake, it’s essential to note that all sponge cakes are cakes, but not all cakes are sponge cakes. The primary difference lies in their texture and ingredients. While traditional cakes often contain butter, resulting in a denser and richer crumb, sponge cakes rely on whipped eggs for their light and airy consistency. Sponge cakes tend to be less sweet and more delicate in flavour, making them a popular choice for layered desserts or as a base for intricate decorations. Ultimately, the defining factor between the two lies in the method of preparation and the desired end result – with sponge cake offering a fluffy and tender alternative to the more decadent qualities of a standard cake.

    What are the ingredients of sponge cake?

    For those curious about the ingredients that make up a delectable sponge cake, simplicity reigns supreme. A classic sponge cake typically calls for just a handful of basic components: eggs, sugar, flour, and often a touch of vanilla extract for added flavour. What sets this airy confection apart is its reliance on whipped eggs to achieve that coveted light and fluffy texture. By combining these humble ingredients with care and precision, bakers can create a delightful treat that is both versatile and utterly delicious.

    What is sponge cake called in America?

    In America, sponge cake is commonly referred to as “angel food cake.” This light and fluffy dessert is known for its airy texture and sweet flavour, making it a popular choice for various occasions. Unlike traditional sponge cakes that may contain butter and egg yolks, angel food cake is made primarily with egg whites, sugar, flour, and sometimes a touch of vanilla extract. Its name reflects its ethereal quality, resembling the lightness of an angel’s wings. Whether enjoyed on its own or topped with fresh fruits and whipped cream, angel food cake remains a beloved treat in American baking culture.

    What are the 4 types of cake?

    When it comes to exploring the diverse world of cakes, one often encounters the question: “What are the 4 types of cake?” The answer to this query typically includes butter cakes, sponge cakes, chiffon cakes, and foam cakes. Among these varieties, sponge cake stands out for its light and airy texture achieved through the use of whipped eggs. Each type of cake brings its own unique characteristics and flavours to the table, catering to a wide range of preferences and occasions. Whether indulging in a rich butter cake or savouring the delicate crumb of a sponge cake, there is a type of cake to suit every taste and celebration.

    What is the secret to a good sponge cake?

    Achieving the perfect sponge cake is often a quest for home bakers and pastry enthusiasts alike, prompting the frequently asked question: What is the secret to a good sponge cake? The answer lies in mastering the delicate balance of key elements such as properly whipped eggs, precise folding of flour, and just the right amount of leavening agent. Ensuring that the eggs are beaten to a light and airy consistency is crucial for creating that signature fluffy texture. Additionally, gentle handling during the mixing process, along with careful oven temperature control, plays a significant role in preventing the cake from becoming dense or dry. Attention to detail and practice are essential in unlocking the secrets to baking a truly exceptional sponge cake that delights both the eyes and taste buds.

    How to make a very moist sponge cake?

    Achieving a very moist sponge cake requires attention to detail and a few key techniques. To ensure a moist outcome, consider using ingredients like buttermilk or sour cream in the batter, as they add richness and moisture. Be cautious not to overmix the batter, as this can lead to a tough texture – instead, gently fold the ingredients together until just combined. Additionally, baking the sponge cake at the correct temperature for the right amount of time is crucial; an oven that is too hot can dry out the cake. Lastly, once baked, storing the sponge cake properly in an airtight container can help retain its moisture for longer-lasting enjoyment.

    Delightful Apple Tart Recipe for a Sweet Treat

    apple tart recipe

    The Perfect Apple Tart Recipe

    Indulge in the delightful flavours of a classic apple tart with this easy-to-follow recipe. Whether you’re a seasoned baker or a novice in the kitchen, this dessert is sure to impress your family and friends.

    Ingredients:

    • 6-8 medium-sized apples (peeled, cored, and thinly sliced)
    • 1 sheet of ready-rolled puff pastry
    • 50g unsalted butter, melted
    • 3 tbsp brown sugar
    • 1 tsp ground cinnamon
    • A pinch of nutmeg
    • Apricot jam for glazing

    Instructions:

    1. Preheat your oven to 200°C (180°C fan).
    2. Roll out the puff pastry on a floured surface and transfer it to a baking tray lined with parchment paper.
    3. In a bowl, mix the melted butter, brown sugar, cinnamon, and nutmeg until well combined.
    4. Spread this mixture evenly over the puff pastry, leaving a small border around the edges.
    5. Arrange the apple slices on top of the pastry in an overlapping pattern.
    6. Bake in the preheated oven for 25-30 minutes or until the pastry is golden brown and the apples are tender.
    7. Remove from the oven and brush the top of the tart with warm apricot jam for a glossy finish.
    8. >

      li>Serve warm with a dollop of whipped cream or a scoop of vanilla ice cream.

    p>Note: Feel free to experiment by adding raisins, almonds or a drizzle of caramel sauce to make this apple tart your own!

    p>Bon appétit!


    Eight Reasons to Love This Easy and Versatile Apple Tart Recipe

    1. Deliciously sweet and tangy flavour combination of apples and cinnamon.
    2. Easy-to-follow recipe suitable for both experienced bakers and beginners.
    3. Requires simple ingredients that are readily available in most kitchens.
    4. Quick to prepare, making it a perfect dessert option for last-minute gatherings.
    5. Versatile dish that can be enjoyed warm or cold, with or without accompaniments.
    6. Impressive presentation that is sure to wow guests at dinner parties or special occasions.
    7. Can be easily customised by adding nuts, raisins, or a drizzle of caramel for extra indulgence.
    8. Leftovers (if any!) can be stored in the fridge and enjoyed the next day for a tasty treat.


    Considerations Before Baking: Potential Drawbacks of an Apple Tart Recipe

    1. Requires peeling and slicing multiple apples, which can be time-consuming.
    2. Puff pastry may not always bake evenly, resulting in some parts being undercooked.
    3. High sugar content from brown sugar and apricot jam may not be suitable for individuals with dietary restrictions.
    4. Leftover apple tart may become soggy when stored in the refrigerator.
    5. Nutritional value is relatively low due to the high amount of butter and sugar used in the recipe.
    6. May not be suitable for those who are allergic to ingredients like nuts or cinnamon.

    Deliciously sweet and tangy flavour combination of apples and cinnamon.

    Experience the perfect harmony of flavours in our apple tart recipe, where the sweetness of ripe apples meets the warm spiciness of cinnamon. This delightful blend creates a tantalising balance between sweet and tangy notes, making every bite a truly indulgent treat for your taste buds.

    Easy-to-follow recipe suitable for both experienced bakers and beginners.

    This apple tart recipe offers a pro that makes it appealing to both experienced bakers and beginners alike. With clear and straightforward instructions, this recipe is easy to follow, guiding bakers of all levels through the steps with ease. Whether you’re a seasoned baker looking for a quick dessert option or a novice eager to try your hand at baking, this recipe ensures a delicious outcome that will impress your taste buds and guests.

    Requires simple ingredients that are readily available in most kitchens.

    Creating a delicious apple tart is made even more appealing by the fact that this recipe requires simple ingredients that are readily available in most kitchens. With just a few basic items like apples, puff pastry, butter, sugar, and spices, anyone can embark on the journey of baking a delectable apple tart without the need for special or hard-to-find ingredients. This accessibility makes it convenient for home cooks to whip up this delightful dessert whenever the craving strikes, adding a touch of sweetness to any occasion effortlessly.

    Quick to prepare, making it a perfect dessert option for last-minute gatherings.

    When it comes to the apple tart recipe, one of its standout advantages is its quick preparation time. This makes it an ideal dessert option for those impromptu gatherings or last-minute dinner parties. With simple steps and readily available ingredients, you can whip up a delicious apple tart in no time, impressing your guests with a homemade treat that is both visually appealing and irresistibly tasty. The convenience and speed of this recipe make it a go-to choice for any occasion where you need a delightful dessert in a pinch.

    Versatile dish that can be enjoyed warm or cold, with or without accompaniments.

    Indulge in the versatility of this apple tart recipe, a dish that can be savoured in various ways. Whether enjoyed warm straight out of the oven, or chilled for a refreshing treat, this dessert caters to different preferences. It can be relished on its own for a simple delight, or paired with accompaniments like whipped cream or ice cream for an extra touch of indulgence. The adaptability of this apple tart makes it a perfect choice for any occasion, offering a delightful experience however you choose to enjoy it.

    Impressive presentation that is sure to wow guests at dinner parties or special occasions.

    Elevate your hosting game with the apple tart recipe’s standout feature: its impressive presentation that is guaranteed to dazzle guests at dinner parties or special occasions. The beautifully arranged layers of thinly sliced apples atop a golden puff pastry base not only promise a visual feast but also hint at the delicious flavours waiting to be savoured. Whether as a show-stopping dessert or a centrepiece on the dining table, this apple tart is sure to leave a lasting impression and make any gathering truly memorable.

    Can be easily customised by adding nuts, raisins, or a drizzle of caramel for extra indulgence.

    Elevate the indulgence of our apple tart recipe by customising it with your favourite additions. Whether you prefer the crunch of nuts, the sweetness of raisins, or the decadence of caramel, these extra touches can take your dessert to a whole new level. Feel free to experiment and make this apple tart uniquely yours by incorporating these delicious enhancements.

    Leftovers (if any!) can be stored in the fridge and enjoyed the next day for a tasty treat.

    When it comes to the apple tart recipe, one of its appealing advantages is the option to store any leftovers in the fridge for a delectable treat the following day. This means that you can savour the delicious flavours of the tart beyond its initial serving, allowing you to enjoy a delightful dessert without any waste. Simply refrigerate the remaining slices and look forward to indulging in a tasty and convenient snack whenever you desire.

    Requires peeling and slicing multiple apples, which can be time-consuming.

    Peeling and slicing multiple apples for this apple tart recipe can be quite time-consuming and laborious. The process of preparing the apples may deter those looking for a quick and easy dessert option. However, the effort put into meticulously arranging the apple slices pays off in the end result, as each bite of the tart showcases the sweet and tender fruit. For those willing to invest the time and attention to detail, the delicious outcome is well worth the extra effort.

    Puff pastry may not always bake evenly, resulting in some parts being undercooked.

    One potential drawback of preparing an apple tart using puff pastry is the inconsistency in baking. Due to the nature of puff pastry, there is a risk that it may not bake evenly, leading to certain areas remaining undercooked while others turn golden brown. This uneven baking can affect the overall texture and presentation of the tart, potentially detracting from the perfect balance of flavours that one would expect. To mitigate this issue, it is crucial to monitor the tart closely during baking and consider techniques such as pre-baking the pastry or adjusting oven temperature for a more uniform outcome.

    High sugar content from brown sugar and apricot jam may not be suitable for individuals with dietary restrictions.

    The apple tart recipe, while delicious and indulgent, may pose a challenge for individuals with dietary restrictions due to its high sugar content from brown sugar and apricot jam. Those who need to monitor their sugar intake or follow specific dietary guidelines may find this dessert unsuitable. It’s important to consider alternative sweeteners or modifications to adapt the recipe to accommodate different dietary needs without compromising on taste and enjoyment.

    Leftover apple tart may become soggy when stored in the refrigerator.

    When storing leftover apple tart in the refrigerator, one potential downside to be mindful of is the risk of it becoming soggy. The moisture from the apples can seep into the pastry over time, compromising its texture and overall appeal. To prevent this, consider placing a paper towel or a piece of parchment paper between the tart and its storage container to absorb excess moisture. Additionally, reheating the apple tart in the oven before serving can help revive its crispness and freshness.

    Nutritional value is relatively low due to the high amount of butter and sugar used in the recipe.

    While apple tart is undeniably a delicious treat, one downside to consider is its relatively low nutritional value. This is primarily attributed to the significant amounts of butter and sugar required in the recipe. The indulgent nature of these ingredients can contribute to higher calorie and fat content, which may not align with a balanced diet. It’s important to enjoy apple tart in moderation and perhaps explore alternative recipes that incorporate healthier substitutes to enhance its nutritional profile.

    May not be suitable for those who are allergic to ingredients like nuts or cinnamon.

    Individuals with allergies to ingredients such as nuts or cinnamon should exercise caution when considering this apple tart recipe. The presence of these allergens in the dish may pose a risk to those with sensitivities or intolerances. It is important for individuals with specific dietary restrictions to carefully review the recipe and potentially seek alternative ingredients or substitutes to ensure their safety and enjoyment of the dessert.

    Delightful Recipe for a Classic British Victoria Sponge Cake

    recipe for

    The Perfect Recipe for a Delicious Lemon Drizzle Cake

    Indulge in the zesty goodness of a classic Lemon Drizzle Cake with this simple yet scrumptious recipe. Whether you’re hosting a tea party or simply craving a sweet treat, this cake is sure to delight your taste buds.

    Ingredients:

    • 225g unsalted butter, softened
    • 225g caster sugar
    • 4 large eggs
    • 225g self-raising flour
    • Zest of 2 lemons
    • Juice of 1 lemon
    • 100g granulated sugar

    Instructions:

    1. Preheat your oven to 180°C (160°C fan) and grease a loaf tin.
    2. In a mixing bowl, cream together the butter and caster sugar until light and fluffy.
    3. Add the eggs one at a time, beating well after each addition.
    4. Gently fold in the self-raising flour and lemon zest until combined.
    5. Pour the batter into the prepared tin and bake for 45-50 minutes or until golden and a skewer inserted comes out clean.
    6. While the cake is baking, mix together the lemon juice and granulated sugar to make the drizzle.
    7. Once the cake is out of the oven, prick it all over with a skewer and pour over the lemon drizzle while it’s still warm.
    8. Allow the cake to cool in the tin before removing and serving slices with a dollop of cream or ice cream.

    Enjoy this delightful Lemon Drizzle Cake as a perfect accompaniment to your afternoon tea or as a tasty dessert after dinner. Its tangy flavour and moist texture are bound to make it a firm favourite among family and friends!


    Five Essential Tips for Perfecting Your Recipe Every Time

    1. Always read the recipe thoroughly before starting to ensure you have all the ingredients and equipment needed.
    2. Use fresh, high-quality ingredients for the best flavour in your dish.
    3. Follow the measurements and instructions carefully to achieve the desired outcome.
    4. Don’t be afraid to experiment with different herbs, spices, or cooking techniques to personalise the recipe to your taste.
    5. Taste as you go and adjust seasoning if necessary to perfect your dish.

    Always read the recipe thoroughly before starting to ensure you have all the ingredients and equipment needed.

    Before embarking on any culinary adventure, it is essential to heed the wise advice of reading the recipe thoroughly beforehand. By familiarising yourself with the ingredients and equipment required, you can ensure a smooth and successful cooking experience. Checking that you have everything on hand not only saves time but also prevents any last-minute dashes to the store mid-preparation. So, take a moment to peruse the recipe, gather your tools, and set yourself up for cooking success from the very start.

    Use fresh, high-quality ingredients for the best flavour in your dish.

    For a truly exceptional culinary experience, it is essential to utilise fresh, high-quality ingredients when preparing your dish. The integrity and richness of flavours that come from using the finest produce can elevate the taste profile of your creation to new heights. Whether it’s vibrant vegetables, succulent meats, or aromatic herbs, sourcing top-notch ingredients ensures that every bite is a delightful sensation for your taste buds. Embrace the essence of premium quality ingredients to unlock the full potential of your cooking and deliver a dining experience that is nothing short of extraordinary.

    Follow the measurements and instructions carefully to achieve the desired outcome.

    It is crucial to follow the measurements and instructions meticulously when preparing a recipe to ensure the desired outcome. Each ingredient plays a specific role in the overall taste and texture of the dish, so precision is key. By adhering closely to the specified quantities and steps, you can enhance the flavours and consistency of your creation, ultimately leading to a successful and delicious result that will impress both yourself and those you are cooking for.

    Don’t be afraid to experiment with different herbs, spices, or cooking techniques to personalise the recipe to your taste.

    When it comes to cooking, don’t be afraid to get creative and experiment with various herbs, spices, or cooking techniques to tailor the recipe to your unique taste preferences. Adding a pinch of this or a dash of that can elevate the flavours and bring a personal touch to your dishes. Whether you prefer a hint of spice, a burst of freshness from herbs, or a new cooking method to enhance texture, embracing experimentation in the kitchen can lead to exciting culinary discoveries that cater specifically to your palate.

    Taste as you go and adjust seasoning if necessary to perfect your dish.

    When following a recipe, it’s crucial to taste as you go and adjust the seasoning accordingly to enhance the flavours of your dish. By regularly sampling your creation throughout the cooking process, you can ensure that the seasoning levels are just right, allowing you to perfect the taste and achieve a delicious outcome. This simple tip not only helps in creating a well-balanced and flavourful dish but also allows you to tailor the seasoning to your personal preference, resulting in a culinary masterpiece that will delight your palate.

    Delicious Pancake Recipe: A Flipping Good Breakfast Treat!

    pancake recipe

    The Perfect Pancake Recipe

    Pancakes are a beloved breakfast treat enjoyed by people all around the world. Whether you like them thin and crispy or thick and fluffy, this versatile dish is always a crowd-pleaser. Here’s a classic pancake recipe that will have you flipping with joy!

    Ingredients:

    • 1 cup all-purpose flour
    • 2 tablespoons sugar
    • 1 teaspoon baking powder
    • 1/2 teaspoon baking soda
    • 1/4 teaspoon salt
    • 1 cup buttermilk
    • 1 large egg
    • 2 tablespoons unsalted butter, melted
    • Butter or oil for cooking

    Instructions:

    1. In a large bowl, whisk together the flour, sugar, baking powder, baking soda, and salt.
    2. In a separate bowl, whisk together the buttermilk, egg, and melted butter.
    3. Pour the wet ingredients into the dry ingredients and stir until just combined. Be careful not to overmix; lumps are okay.
    4. Heat a non-stick pan or griddle over medium heat and add a small amount of butter or oil.
    5. Spoon about 1/4 cup of batter onto the pan for each pancake.
    6. >

      li>Cook until bubbles form on the surface of the pancake, then flip and cook for another minute or until golden brown.

      >

      li>Repeat with the remaining batter.

    p>Serve your pancakes hot with your favourite toppings such as maple syrup, fresh berries, whipped cream or chocolate sauce. Enjoy!

    p>This recipe makes approximately 8-10 pancakes depending on size. Feel free to double or halve the ingredients to suit your needs. Happy flipping!


    8 Essential Tips for Perfect Pancakes Every Time

    1. Use a non-stick frying pan to cook the pancakes.
    2. Preheat the pan on medium heat before pouring the batter.
    3. Ensure the batter is smooth and free of lumps for fluffy pancakes.
    4. Flip the pancake when bubbles appear on the surface and the edges look set.
    5. Add a little butter or oil to the pan between batches to prevent sticking.
    6. Serve pancakes warm with your favourite toppings like maple syrup, fruits, or whipped cream.
    7. Experiment with different flavours such as vanilla extract or cinnamon in the batter.
    8. For a healthier option, consider using whole wheat flour or adding oats to the batter.

    Use a non-stick frying pan to cook the pancakes.

    When preparing pancakes, it is advisable to use a non-stick frying pan for cooking. This choice of cookware helps ensure that the pancakes cook evenly and do not stick to the surface, making flipping them easier and preventing any unwanted tearing or breakage. The non-stick properties of the pan also require less oil or butter for greasing, resulting in healthier and more aesthetically pleasing pancakes. By utilising a non-stick frying pan, you can enhance your pancake-making experience and achieve delicious, perfectly cooked pancakes with minimal effort.

    Preheat the pan on medium heat before pouring the batter.

    For the perfect pancakes, it’s essential to preheat the pan on medium heat before pouring the batter. This step ensures that the pancakes cook evenly and develop a golden-brown exterior while remaining fluffy on the inside. By preheating the pan, you create a hot surface that allows the batter to start cooking immediately, resulting in delicious pancakes with a consistent texture. Remember, a well-heated pan is key to achieving pancake perfection every time.

    Ensure the batter is smooth and free of lumps for fluffy pancakes.

    To achieve fluffy pancakes, it is crucial to ensure that the batter is smooth and free of lumps. By whisking together the dry and wet ingredients until just combined, you can prevent overmixing, which can result in tough pancakes. A smooth batter allows for even distribution of leavening agents like baking powder and baking soda, leading to those light and airy pancakes we all love. So take your time to mix the batter gently but thoroughly to guarantee a delightful stack of fluffy pancakes every time.

    Flip the pancake when bubbles appear on the surface and the edges look set.

    When preparing your pancakes using this recipe, a helpful tip is to flip them at the right moment. Look for bubbles forming on the surface and observe the edges to appear set. This visual cue indicates that it’s time to gently flip the pancake, ensuring that both sides are cooked to golden perfection. Mastering the art of timing will result in deliciously fluffy pancakes that are evenly cooked throughout.

    Add a little butter or oil to the pan between batches to prevent sticking.

    To ensure your pancakes cook to perfection without sticking, a handy tip is to add a small amount of butter or oil to the pan between batches. This simple step not only helps prevent the pancakes from sticking but also adds a delicious hint of flavour to each batch. By greasing the pan lightly, you can achieve beautifully golden and evenly cooked pancakes every time.

    Serve pancakes warm with your favourite toppings like maple syrup, fruits, or whipped cream.

    To enhance your pancake experience, consider serving them warm with a delightful array of toppings. Whether you prefer the classic drizzle of maple syrup, the freshness of seasonal fruits, or the indulgence of whipped cream, customizing your pancakes with these delicious additions can elevate your breakfast or brunch to a whole new level. The combination of fluffy pancakes and your favourite toppings creates a symphony of flavours that is sure to delight your taste buds.

    Experiment with different flavours such as vanilla extract or cinnamon in the batter.

    Enhance your pancake experience by experimenting with various flavours in the batter. Adding a splash of vanilla extract can impart a subtle sweetness and aromatic depth to your pancakes, while a sprinkle of cinnamon can infuse warm and comforting notes. These simple additions can elevate the taste profile of your pancakes, making each bite a delightful and flavourful sensation. Don’t be afraid to get creative in the kitchen and discover new combinations that suit your taste preferences.

    For a healthier option, consider using whole wheat flour or adding oats to the batter.

    For a healthier twist on your pancake recipe, you can opt for whole wheat flour or incorporate oats into the batter. Whole wheat flour adds a nutty flavour and extra fibre, while oats provide a hearty texture and additional nutrients. These simple swaps not only enhance the nutritional value of your pancakes but also offer a deliciously wholesome alternative for a guilt-free indulgence.

    Delicious Homemade Bagel Recipe: A Tasty Treat for Any Occasion

    bagel recipe

    The Perfect Bagel Recipe: A Delicious Treat for Any Time of Day

    Bagels are a beloved treat that can be enjoyed at any time of day. Whether you prefer them plain, with cream cheese, or filled with your favourite toppings, making your own bagels at home is a rewarding experience. Here’s a simple and delicious bagel recipe that will have you coming back for more.

    Ingredients:

    • 500g strong white bread flour
    • 7g dried yeast
    • 2 tsp salt
    • 2 tbsp sugar
    • 300ml warm water
    • 1 egg, beaten (for egg wash)

    Instructions:

    1. In a large bowl, mix the flour, yeast, salt, and sugar together.
    2. Add the warm water and mix until a dough forms.
    3. Knead the dough on a floured surface for about 10 minutes until smooth and elastic.
    4. Divide the dough into equal-sized balls and shape them into bagel rings. Let them rest for 10 minutes.
    5. In a large pot of boiling water, boil the bagels for 1-2 minutes on each side. Remove and place on a baking tray lined with parchment paper.
    6. Brush the bagels with beaten egg wash and sprinkle with your favourite toppings like sesame seeds or poppy seeds.
    7. Bake in a preheated oven at 200°C for 20-25 minutes until golden brown.

    Your homemade bagels are now ready to be enjoyed! Serve them warm with cream cheese, smoked salmon, or any other topping of your choice. Experiment with different flavours and fillings to create your perfect bagel masterpiece. Enjoy!

    Note: Feel free to customize this recipe by adding herbs, cheese, or even cinnamon and raisins for sweet variations.


    Exploring Bagels: Ingredients, Secrets, Health Comparisons, and Dough Differences

    1. What are the ingredients in a bagel?
    2. What is the secret to making bagels?
    3. Are bagels more unhealthy than bread?
    4. Is bagel dough different from bread dough?

    What are the ingredients in a bagel?

    A classic bagel recipe typically includes a few key ingredients that contribute to its unique texture and flavour. The main components of a bagel include strong white bread flour, dried yeast for leavening, salt for seasoning, sugar to enhance the dough’s flavour, and warm water to bind everything together. These simple yet essential ingredients come together to create the iconic chewy texture and slightly crispy crust that bagel lovers adore. Feel free to experiment with additional toppings or fillings to tailor your bagels to your personal taste preferences.

    What is the secret to making bagels?

    When it comes to making bagels, the secret lies in achieving the perfect balance of texture and flavour. The key to successful bagel-making is in the dough preparation and cooking method. Using high-quality bread flour, allowing the dough to rise properly, and boiling the bagels briefly before baking them are crucial steps to ensure that they have that iconic chewy texture and golden crust. Additionally, adding a touch of sweetness with sugar or honey can enhance the overall taste of the bagels. Patience and attention to detail are essential in mastering the art of creating delicious homemade bagels that will delight your taste buds with every bite.

    Are bagels more unhealthy than bread?

    When comparing bagels to regular bread, it’s important to consider their differences in ingredients and preparation. Bagels are typically denser and chewier than sliced bread, often containing more calories and carbohydrates due to their higher flour content. Additionally, some bagels may be larger in size, leading to a higher calorie intake if consumed in excess. However, the healthiness of bagels versus bread ultimately depends on individual dietary needs and choices. Opting for whole grain or multigrain varieties of both bagels and bread can provide added nutrients like fibre and essential minerals. Moderation and mindful consumption play key roles in maintaining a balanced diet regardless of whether you choose a bagel or bread as part of your meal plan.

    Is bagel dough different from bread dough?

    When it comes to bagel dough versus bread dough, there are notable differences that contribute to the unique texture and taste of bagels. Bagel dough is typically denser and chewier compared to traditional bread dough. This is achieved by using high-gluten flour and boiling the shaped dough before baking, which gives bagels their characteristic chewiness and shiny crust. The addition of malt syrup or honey in bagel dough also sets it apart from standard bread recipes. So, while both bagel and bread dough share some similarities in ingredients, the specific techniques and ingredients used in bagel-making result in a distinct product that is loved by many for its satisfying bite and flavour.

    Flipping Fantastic: Exploring the World of Pancakes

    pancakes

    The Delicious World of Pancakes

    Pancakes, a beloved breakfast staple enjoyed by people around the globe, have a rich history and endless variations that cater to every palate. Whether you prefer them thin and crepe-like or thick and fluffy, there is a pancake for everyone.

    Originating from ancient Greece and Rome, pancakes have evolved over centuries to become a versatile dish that can be sweet or savoury, simple or elaborate. In the UK, pancakes are traditionally enjoyed on Shrove Tuesday, also known as Pancake Day, where families gather to flip and feast on these delectable treats.

    One of the most popular toppings for pancakes in the UK is classic lemon and sugar, providing a perfect balance of tangy and sweet flavours. For those with a sweet tooth, maple syrup, chocolate spread, or fresh berries are delightful accompaniments that elevate the pancake experience.

    For those looking for a savoury twist, toppings like crispy bacon, melted cheese, or smoked salmon can turn pancakes into a satisfying meal any time of day. Experimenting with different ingredients such as herbs, spices, and vegetables opens up a world of creative possibilities for pancake enthusiasts.

    Whether you enjoy them as a leisurely weekend brunch or a quick weekday breakfast on-the-go, pancakes never fail to bring joy and comfort with every bite. So next time you’re craving something delicious and comforting, whip up a batch of pancakes and indulge in this timeless culinary delight.


    Everything You Need to Know About Pancakes: Recipes, Tips, and Traditions

    1. 1. How do you make pancakes from scratch?
    2. 2. What is the difference between American pancakes and British pancakes?
    3. 3. Can you freeze pancakes?
    4. 4. What are some creative pancake toppings?
    5. 5. Are there any vegan or gluten-free pancake recipes?
    6. 6. How can I make fluffy pancakes?
    7. 7. What is the history of Pancake Day in the UK?
    8. 8. Are there any healthy pancake recipes?

    1. How do you make pancakes from scratch?

    When it comes to making pancakes from scratch, the process is surprisingly simple and rewarding. To start, you’ll need basic ingredients like flour, eggs, milk, and a pinch of salt. Begin by whisking the dry ingredients together before adding in the wet ingredients to form a smooth batter. Heat a non-stick pan or griddle, ladle the batter onto the surface, and cook until bubbles form on the top before flipping to cook the other side. The key is patience and a watchful eye to achieve that perfect golden-brown hue. Once cooked, serve your homemade pancakes with your favourite toppings for a delicious breakfast or snack that will surely impress your taste buds.

    2. What is the difference between American pancakes and British pancakes?

    When comparing American pancakes to British pancakes, the key differences lie in their texture and thickness. American pancakes are typically thicker and fluffier, thanks to the addition of baking powder or baking soda in the batter, which helps them rise. They often have a lighter, cake-like consistency and are commonly served stacked with butter and maple syrup. On the other hand, British pancakes are thinner and more akin to crepes, with a delicate and slightly chewy texture. They are usually enjoyed with simple toppings like lemon juice and sugar or jam. These distinctions in preparation and presentation contribute to the unique characteristics that define American and British pancakes, offering diverse options for pancake enthusiasts to savour.

    3. Can you freeze pancakes?

    Freezing pancakes is a convenient way to enjoy this breakfast favourite at any time. Whether you have leftover pancakes or want to prepare a batch in advance, freezing them can help extend their shelf life. To freeze pancakes, simply allow them to cool completely, then stack them with parchment paper in between to prevent sticking. Place the stack in an airtight container or freezer bag before storing in the freezer. When ready to enjoy, simply reheat the frozen pancakes in a toaster, microwave, or oven for a quick and delicious meal on-the-go.

    4. What are some creative pancake toppings?

    When it comes to creative pancake toppings, the options are truly endless. From indulgent combinations like Nutella and sliced bananas to more adventurous choices such as savoury bacon and avocado, there is something to suit every taste bud. For a burst of freshness, try topping your pancakes with a mix of fresh berries and a drizzle of honey. If you’re feeling nostalgic, a dollop of whipped cream and sprinkles will bring back childhood memories. Don’t be afraid to experiment with unconventional pairings like peanut butter and jelly or even smoked salmon and cream cheese for a unique twist on the classic pancake experience.

    5. Are there any vegan or gluten-free pancake recipes?

    For those with dietary restrictions or preferences, there are plenty of vegan and gluten-free pancake recipes available that cater to a variety of needs. Vegan pancakes can be made using plant-based alternatives such as almond milk, flaxseed eggs, and coconut oil, resulting in fluffy and delicious pancakes without any animal products. Similarly, gluten-free pancake recipes often utilise ingredients like rice flour, almond flour, or gluten-free oats to create pancakes that are safe for individuals with gluten sensitivities or celiac disease. With these alternative recipes, everyone can enjoy the simple pleasure of indulging in a stack of pancakes without compromising on taste or dietary requirements.

    6. How can I make fluffy pancakes?

    To achieve fluffy pancakes, there are a few key tips to keep in mind. Firstly, ensure that your pancake batter is not overmixed; a few lumps are okay as overmixing can lead to dense pancakes. Secondly, let the batter rest for a few minutes before cooking to allow the leavening agents to work their magic. When cooking, use medium heat on a preheated griddle or pan and wait for bubbles to form on the surface before flipping. This will result in light and airy pancakes that are sure to impress your taste buds.

    7. What is the history of Pancake Day in the UK?

    Pancake Day, also known as Shrove Tuesday, holds a significant place in the cultural and culinary calendar of the UK. This tradition dates back centuries and is rooted in the Christian observance of Lent. Shrove Tuesday falls on the day before Ash Wednesday, marking the beginning of the Lenten season leading up to Easter. Pancakes became associated with this day as a way for people to use up rich ingredients like eggs, milk, and sugar before the fasting period of Lent began. The act of making and consuming pancakes on this day symbolises indulgence and celebration before the solemnity of Lent. Today, Pancake Day in the UK is a time-honoured custom where families and communities come together to enjoy delicious pancakes in various forms, carrying on this historical tradition with joy and festivity.

    8. Are there any healthy pancake recipes?

    When it comes to pancakes, there are indeed healthy recipe options available for those looking to enjoy this classic dish without compromising on nutrition. By incorporating ingredients like whole wheat flour, oats, Greek yogurt, and fresh fruits into the batter, you can create pancakes that are not only delicious but also packed with fibre, protein, and vitamins. Opting for toppings such as natural nut butter, honey, or unsweetened yogurt can further enhance the health benefits of your pancakes. With a little creativity and some mindful ingredient choices, you can indulge in a nutritious stack of pancakes guilt-free.