Delightful Apple Tart Recipe for a Sweet Treat
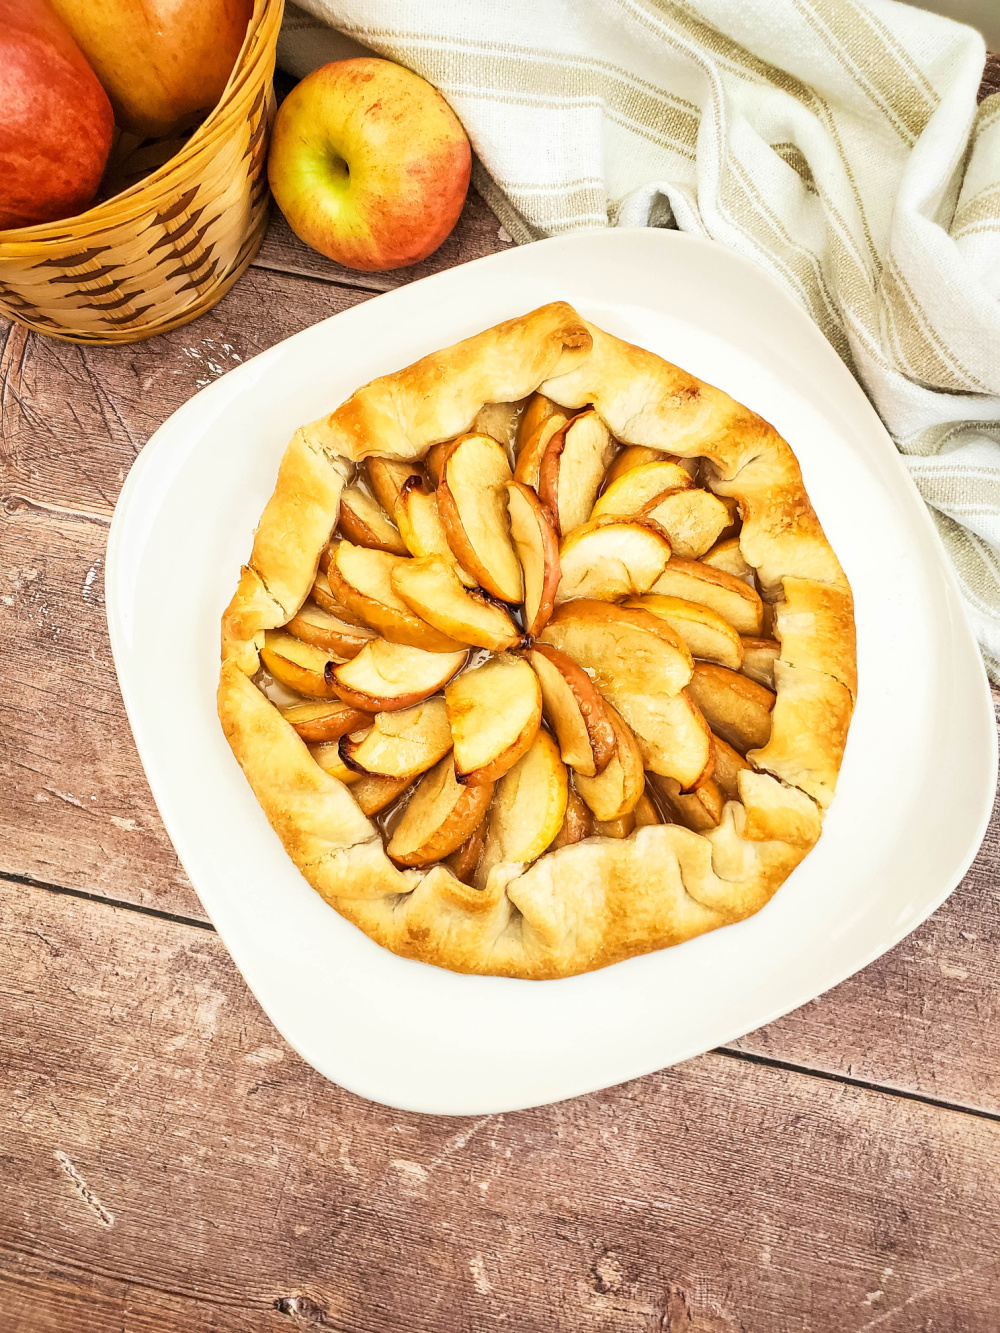
The Perfect Apple Tart Recipe
Indulge in the delightful flavours of a classic apple tart with this easy-to-follow recipe. Whether you’re a seasoned baker or a novice in the kitchen, this dessert is sure to impress your family and friends.
Ingredients:
- 6-8 medium-sized apples (peeled, cored, and thinly sliced)
- 1 sheet of ready-rolled puff pastry
- 50g unsalted butter, melted
- 3 tbsp brown sugar
- 1 tsp ground cinnamon
- A pinch of nutmeg
- Apricot jam for glazing
Instructions:
- Preheat your oven to 200°C (180°C fan).
- Roll out the puff pastry on a floured surface and transfer it to a baking tray lined with parchment paper.
- In a bowl, mix the melted butter, brown sugar, cinnamon, and nutmeg until well combined.
- Spread this mixture evenly over the puff pastry, leaving a small border around the edges.
- Arrange the apple slices on top of the pastry in an overlapping pattern.
- Bake in the preheated oven for 25-30 minutes or until the pastry is golden brown and the apples are tender.
- Remove from the oven and brush the top of the tart with warm apricot jam for a glossy finish.
>
li>Serve warm with a dollop of whipped cream or a scoop of vanilla ice cream.
p>Note: Feel free to experiment by adding raisins, almonds or a drizzle of caramel sauce to make this apple tart your own!
p>Bon appétit!
Eight Reasons to Love This Easy and Versatile Apple Tart Recipe
- Deliciously sweet and tangy flavour combination of apples and cinnamon.
- Easy-to-follow recipe suitable for both experienced bakers and beginners.
- Requires simple ingredients that are readily available in most kitchens.
- Quick to prepare, making it a perfect dessert option for last-minute gatherings.
- Versatile dish that can be enjoyed warm or cold, with or without accompaniments.
- Impressive presentation that is sure to wow guests at dinner parties or special occasions.
- Can be easily customised by adding nuts, raisins, or a drizzle of caramel for extra indulgence.
- Leftovers (if any!) can be stored in the fridge and enjoyed the next day for a tasty treat.
Considerations Before Baking: Potential Drawbacks of an Apple Tart Recipe
- Requires peeling and slicing multiple apples, which can be time-consuming.
- Puff pastry may not always bake evenly, resulting in some parts being undercooked.
- High sugar content from brown sugar and apricot jam may not be suitable for individuals with dietary restrictions.
- Leftover apple tart may become soggy when stored in the refrigerator.
- Nutritional value is relatively low due to the high amount of butter and sugar used in the recipe.
- May not be suitable for those who are allergic to ingredients like nuts or cinnamon.
Deliciously sweet and tangy flavour combination of apples and cinnamon.
Experience the perfect harmony of flavours in our apple tart recipe, where the sweetness of ripe apples meets the warm spiciness of cinnamon. This delightful blend creates a tantalising balance between sweet and tangy notes, making every bite a truly indulgent treat for your taste buds.
Easy-to-follow recipe suitable for both experienced bakers and beginners.
This apple tart recipe offers a pro that makes it appealing to both experienced bakers and beginners alike. With clear and straightforward instructions, this recipe is easy to follow, guiding bakers of all levels through the steps with ease. Whether you’re a seasoned baker looking for a quick dessert option or a novice eager to try your hand at baking, this recipe ensures a delicious outcome that will impress your taste buds and guests.
Requires simple ingredients that are readily available in most kitchens.
Creating a delicious apple tart is made even more appealing by the fact that this recipe requires simple ingredients that are readily available in most kitchens. With just a few basic items like apples, puff pastry, butter, sugar, and spices, anyone can embark on the journey of baking a delectable apple tart without the need for special or hard-to-find ingredients. This accessibility makes it convenient for home cooks to whip up this delightful dessert whenever the craving strikes, adding a touch of sweetness to any occasion effortlessly.
Quick to prepare, making it a perfect dessert option for last-minute gatherings.
When it comes to the apple tart recipe, one of its standout advantages is its quick preparation time. This makes it an ideal dessert option for those impromptu gatherings or last-minute dinner parties. With simple steps and readily available ingredients, you can whip up a delicious apple tart in no time, impressing your guests with a homemade treat that is both visually appealing and irresistibly tasty. The convenience and speed of this recipe make it a go-to choice for any occasion where you need a delightful dessert in a pinch.
Versatile dish that can be enjoyed warm or cold, with or without accompaniments.
Indulge in the versatility of this apple tart recipe, a dish that can be savoured in various ways. Whether enjoyed warm straight out of the oven, or chilled for a refreshing treat, this dessert caters to different preferences. It can be relished on its own for a simple delight, or paired with accompaniments like whipped cream or ice cream for an extra touch of indulgence. The adaptability of this apple tart makes it a perfect choice for any occasion, offering a delightful experience however you choose to enjoy it.
Impressive presentation that is sure to wow guests at dinner parties or special occasions.
Elevate your hosting game with the apple tart recipe’s standout feature: its impressive presentation that is guaranteed to dazzle guests at dinner parties or special occasions. The beautifully arranged layers of thinly sliced apples atop a golden puff pastry base not only promise a visual feast but also hint at the delicious flavours waiting to be savoured. Whether as a show-stopping dessert or a centrepiece on the dining table, this apple tart is sure to leave a lasting impression and make any gathering truly memorable.
Can be easily customised by adding nuts, raisins, or a drizzle of caramel for extra indulgence.
Elevate the indulgence of our apple tart recipe by customising it with your favourite additions. Whether you prefer the crunch of nuts, the sweetness of raisins, or the decadence of caramel, these extra touches can take your dessert to a whole new level. Feel free to experiment and make this apple tart uniquely yours by incorporating these delicious enhancements.
Leftovers (if any!) can be stored in the fridge and enjoyed the next day for a tasty treat.
When it comes to the apple tart recipe, one of its appealing advantages is the option to store any leftovers in the fridge for a delectable treat the following day. This means that you can savour the delicious flavours of the tart beyond its initial serving, allowing you to enjoy a delightful dessert without any waste. Simply refrigerate the remaining slices and look forward to indulging in a tasty and convenient snack whenever you desire.
Requires peeling and slicing multiple apples, which can be time-consuming.
Peeling and slicing multiple apples for this apple tart recipe can be quite time-consuming and laborious. The process of preparing the apples may deter those looking for a quick and easy dessert option. However, the effort put into meticulously arranging the apple slices pays off in the end result, as each bite of the tart showcases the sweet and tender fruit. For those willing to invest the time and attention to detail, the delicious outcome is well worth the extra effort.
Puff pastry may not always bake evenly, resulting in some parts being undercooked.
One potential drawback of preparing an apple tart using puff pastry is the inconsistency in baking. Due to the nature of puff pastry, there is a risk that it may not bake evenly, leading to certain areas remaining undercooked while others turn golden brown. This uneven baking can affect the overall texture and presentation of the tart, potentially detracting from the perfect balance of flavours that one would expect. To mitigate this issue, it is crucial to monitor the tart closely during baking and consider techniques such as pre-baking the pastry or adjusting oven temperature for a more uniform outcome.
High sugar content from brown sugar and apricot jam may not be suitable for individuals with dietary restrictions.
The apple tart recipe, while delicious and indulgent, may pose a challenge for individuals with dietary restrictions due to its high sugar content from brown sugar and apricot jam. Those who need to monitor their sugar intake or follow specific dietary guidelines may find this dessert unsuitable. It’s important to consider alternative sweeteners or modifications to adapt the recipe to accommodate different dietary needs without compromising on taste and enjoyment.
Leftover apple tart may become soggy when stored in the refrigerator.
When storing leftover apple tart in the refrigerator, one potential downside to be mindful of is the risk of it becoming soggy. The moisture from the apples can seep into the pastry over time, compromising its texture and overall appeal. To prevent this, consider placing a paper towel or a piece of parchment paper between the tart and its storage container to absorb excess moisture. Additionally, reheating the apple tart in the oven before serving can help revive its crispness and freshness.
Nutritional value is relatively low due to the high amount of butter and sugar used in the recipe.
While apple tart is undeniably a delicious treat, one downside to consider is its relatively low nutritional value. This is primarily attributed to the significant amounts of butter and sugar required in the recipe. The indulgent nature of these ingredients can contribute to higher calorie and fat content, which may not align with a balanced diet. It’s important to enjoy apple tart in moderation and perhaps explore alternative recipes that incorporate healthier substitutes to enhance its nutritional profile.
May not be suitable for those who are allergic to ingredients like nuts or cinnamon.
Individuals with allergies to ingredients such as nuts or cinnamon should exercise caution when considering this apple tart recipe. The presence of these allergens in the dish may pose a risk to those with sensitivities or intolerances. It is important for individuals with specific dietary restrictions to carefully review the recipe and potentially seek alternative ingredients or substitutes to ensure their safety and enjoyment of the dessert.