Homemade Chicken Pot Pie: A Comforting Classic with Golden, Flaky Pastry

homemade chicken pot pie

Homemade Chicken Pot Pie

Golden, flaky pastry wrapped around tender chicken and vegetables in a creamy sauce makes chicken pot pie a comforting favourite. It is a satisfying meal for a chilly evening, and a useful way to turn leftover cooked chicken into something special. This version has a crisp pastry lid and a rich, savoury filling.

At a glance

  • Serves: 6
  • Preparation time: 30 minutes
  • Cooking time: 45 minutes

Ingredients

For the pastry

  • 250g plain flour, plus extra for rolling
  • 125g cold unsalted butter, cut into cubes
  • A pinch of salt
  • 4–6 tablespoons cold water
  • 1 egg, beaten, for glazing

For the filling

  • 40g butter
  • 1 onion, finely chopped
  • 2 carrots, peeled and diced
  • 2 celery sticks, diced
  • 40g plain flour
  • 500ml chicken stock
  • 150ml double cream or whole milk
  • 500g cooked chicken, cut into bite-sized pieces
  • 150g frozen peas
  • 1 teaspoon fresh thyme leaves, or ½ teaspoon dried thyme
  • Salt and freshly ground black pepper

Method

  1. Make the pastry. Put the flour and salt into a bowl. Rub in the cold butter with your fingertips until the mixture resembles breadcrumbs. Add the cold water a little at a time, mixing until the dough just comes together. Shape it into a flat disc, wrap and chill for at least 30 minutes.

  2. Cook the vegetables. Melt the butter in a large saucepan over a medium heat. Add the onion, carrots and celery and cook for 8–10 minutes, stirring now and then, until beginning to soften.

  3. Make the sauce. Stir in the flour and cook for 1 minute. Gradually pour in the chicken stock, stirring to keep the sauce smooth. Bring to a gentle simmer and cook for 5–7 minutes, until thickened. Stir in the cream or milk, chicken, peas and thyme. Season to taste, then leave the filling to cool slightly.

  4. Prepare the pie. Heat the oven to 200°C (180°C fan) or Gas Mark 6. Spoon the filling into a deep pie dish. On a lightly floured surface, roll out the pastry until it is slightly larger than the dish.

  5. Add the pastry lid. Brush the rim of the dish with a little beaten egg. Lay the pastry over the filling and press the edges down to seal. Trim away any excess and crimp the edge with your fingers or a fork. Cut a small slit in the centre to let steam escape, then brush the pastry with beaten egg.

  6. Bake. Place the pie on a baking tray and bake for 30–35 minutes, until the pastry is puffed and deep golden and the filling is bubbling. Leave it to stand for 10 minutes before serving.

Tips for a delicious pie

  • Cool the filling before adding the pastry. A hot filling can soften the pastry before it has a chance to bake.
  • Keep the pastry as cool as possible while working with it, and handle it gently for a tender, flaky result.
  • For extra flavour, use leftover roast chicken and include any meat from the legs as well as the breast.
  • Put the pie dish on a baking tray to catch any filling that bubbles over.
  • Make sure the filling is piping hot throughout before serving. If using freshly cooked chicken, it should reach a safe internal temperature of 75°C.

What to serve with chicken pot pie

Chicken pot pie is a hearty meal on its own, but it also goes well with steamed greens, tender-stem broccoli or a crisp green salad. For an especially comforting supper, serve it with buttery mashed potatoes.

Storing and reheating

Cool leftovers promptly and store them in a covered container in the fridge for up to two days. Reheat until piping hot throughout. The pie can also be assembled ahead of time: keep the filling and pastry separate in the fridge, then add the pastry lid and bake when ready.


Understanding Homemade Chicken Pot Pie: Ingredients, Crust, and Creamy Filling Explained

  1. What is the crust on a pot pie made of?
  2. What is chicken pot pie filling made of?
  3. What is chicken pot pie gravy made of?
  4. What are the main ingredients of chicken pot pie?
  5. What is the sauce made of in chicken pot pie?
  6. What makes chicken pot pie creamy?

What is the crust on a pot pie made of?

The crust on a homemade chicken pot pie is usually made from plain flour, cold butter, a pinch of salt and just enough cold water to bring the mixture together. This creates a tender, flaky pastry lid. Some recipes use ready-made shortcrust or puff pastry instead, while others add a bottom crust as well as a lid.

What is chicken pot pie filling made of?

Chicken pot pie filling is typically made with cooked chicken, vegetables such as carrots, peas, onion and celery, and a creamy sauce. The sauce is often thickened with flour and made using butter, chicken stock and milk or cream, then seasoned with salt, pepper and herbs such as thyme. Ingredients can be varied to suit your taste or make use of leftover vegetables.

What is chicken pot pie gravy made of?

Chicken pot pie gravy is usually made by cooking butter and flour together to form a roux, then gradually whisking in chicken stock until smooth and thick. Cream or milk adds richness, while salt, pepper and herbs such as thyme provide flavour. The chicken and vegetables are stirred through the sauce before the pie is topped with pastry and baked.

What are the main ingredients of chicken pot pie?

The main ingredients in a homemade chicken pot pie are cooked chicken, vegetables such as carrots, peas, onion and celery, and a creamy sauce made with butter, flour and chicken stock. These are topped with pastry—often shortcrust or puff pastry—and baked until golden. Seasonings such as thyme, salt and black pepper add extra flavour.

What is the sauce made of in chicken pot pie?

The sauce in chicken pot pie is usually made from butter, flour and chicken stock, with milk or cream added for a smooth, rich finish. The butter and flour are cooked together to make a roux, then the stock is stirred in gradually until the sauce thickens. Seasonings such as salt, black pepper and thyme add extra flavour.

What makes chicken pot pie creamy?

Chicken pot pie gets its creamy texture from a thickened sauce made with butter, flour and chicken stock, finished with double cream or whole milk. The butter and flour form a roux, which helps the sauce thicken, while the dairy adds richness and a smooth finish. For an extra-creamy filling, stir in a little more cream, but keep the sauce thick enough to hold its shape beneath the pastry.

Classic Meat Pie Recipe: A Comforting British Favourite

meat pie recipe

Classic Beef and Ale Pie Recipe

A golden, crisp pastry crust filled with tender beef in a rich, savoury gravy makes this classic meat pie ideal for a comforting family meal. The filling can be prepared ahead, giving the flavours time to develop and making assembly straightforward.

Preparation and cooking time

  • Preparation: 25 minutes
  • Cooking: 2 hours 30 minutes
  • Serves: 6

Ingredients

  • 2 tbsp vegetable oil
  • 900g stewing beef, cut into bite-sized pieces
  • 2 tbsp plain flour, seasoned with salt and black pepper
  • 1 large onion, finely chopped
  • 2 carrots, peeled and diced
  • 2 celery sticks, diced
  • 2 tbsp tomato purée
  • 330ml ale or stout
  • 300ml beef stock
  • 1 tsp fresh thyme leaves, or ½ tsp dried thyme
  • 1 bay leaf
  • 1 sheet ready-rolled puff pastry, about 320g
  • 1 egg, beaten

Method

  1. Brown the beef: Toss the beef in the seasoned flour. Heat the oil in a large, heavy-based pan over a medium-high heat. Brown the beef in batches, then set it aside.
  2. Cook the vegetables: Add the onion, carrots and celery to the pan. Cook for 5–7 minutes, stirring occasionally, until softened. Stir in the tomato purée and cook for another minute.
  3. Make the filling: Pour in the ale and scrape the bottom of the pan to loosen any browned bits. Add the stock, thyme and bay leaf, then return the beef to the pan. Bring to a gentle simmer.
  4. Simmer until tender: Cover and cook gently for about 1 hour 45 minutes to 2 hours, stirring now and then, until the beef is tender and the gravy has thickened. Remove the bay leaf and leave the filling to cool. Taste and adjust the seasoning.
  5. Prepare the pie: Heat the oven to 200°C (180°C fan)/400°F/Gas Mark 6. Spoon the cooled filling into a pie dish. Lay the pastry over the top, trimming any excess. Press the edges to seal and make a small hole in the centre to let steam escape.
  6. Glaze and bake: Brush the pastry with beaten egg. Bake for 25–30 minutes, until puffed and golden. Leave to stand for 5 minutes before serving.

Tips for a great meat pie

  • Let the filling cool before adding the pastry; hot filling can make it soft and difficult to handle.
  • If the gravy is too thin, simmer the filling uncovered for a few minutes before cooling.
  • For a family-friendly version without alcohol, replace the ale with extra beef stock.
  • Serve with mashed potatoes, peas or seasonal greens.

This hearty beef pie is best served hot from the oven, when the pastry is crisp and the filling is rich and tender. Any leftovers can be cooled, covered and refrigerated, then reheated thoroughly before serving.


Top Tips for Perfect Meat Pies: Best Cuts, Baking Advice, and More

  1. What cut of meat is best for a meat pie?
  2. How do you stop the pastry from getting soggy?
  3. Can you make a meat pie ahead of time?
  4. How long should you bake a meat pie?
  5. Can you freeze a meat pie?

What cut of meat is best for a meat pie?

For a tender, flavourful meat pie, choose a well-marbled cut that becomes soft during slow cooking, such as beef chuck, braising steak or shin. These cuts develop a rich flavour and make a succulent filling when simmered gently until tender. For a quicker pie, use leftover roast meat, but take care not to overcook it, as it may become dry.

How do you stop the pastry from getting soggy?

To help keep the pastry crisp, let the meat filling cool completely before assembling the pie, and make sure the gravy is thick rather than watery. Avoid overfilling, cut a small steam vent in the pastry, and bake the pie in a fully preheated oven. If the filling is particularly moist, try brushing the base with beaten egg and letting it dry briefly before adding the filling.

Can you make a meat pie ahead of time?

Yes, you can make a meat pie ahead of time. Prepare and cook the filling, then let it cool completely before assembling the pie. Cover and refrigerate it for up to two days, or freeze it for longer storage. For the best pastry, add it just before baking; if the pie is already assembled, keep it covered in the fridge and bake within a day, adding a little extra time if it goes into the oven cold.

How long should you bake a meat pie?

Bake a meat pie in a preheated oven at 200°C (180°C fan)/400°F/Gas Mark 6 for around 25–30 minutes, or until the pastry is risen and golden and the filling is piping hot. If the filling is already hot when assembled, it may need less time; a pie made with cold filling may take a little longer. Follow the pastry packet instructions where available, and cover the top loosely with foil if it browns too quickly.

Can you freeze a meat pie?

Yes, you can freeze a meat pie. For the best results, freeze it before baking: assemble the pie, wrap it well and freeze for up to three months. Bake from frozen, adding extra cooking time and covering the pastry with foil if it browns too quickly; make sure the filling is piping hot all the way through before serving. You can also freeze a baked pie once it has cooled completely. Wrap it securely, thaw it in the fridge and reheat thoroughly in the oven.

Easy Swiss Steak Recipe: Tender Beef in Rich Tomato Gravy

swiss steak recipe

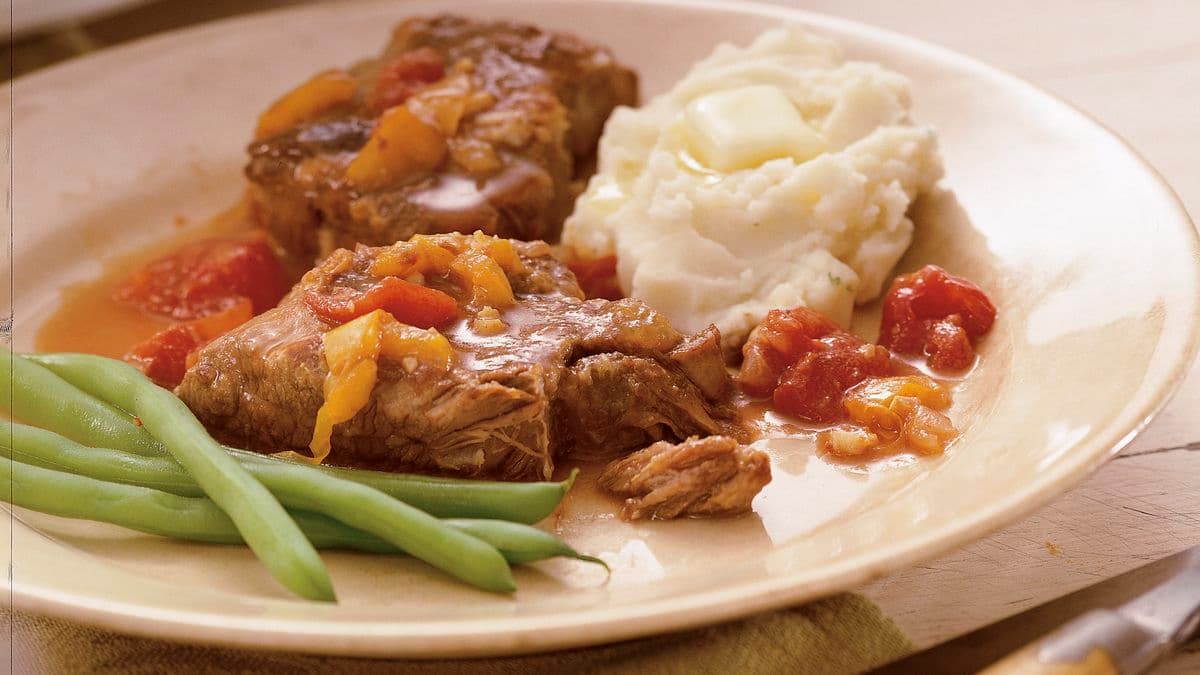
Swiss Steak Recipe

Swiss steak is a comforting dish of tenderised beef slowly braised in a rich tomato and vegetable sauce. Despite its name, it is not a Swiss dish: “swissing” refers to a method of tenderising meat by pounding or rolling it. This straightforward version uses braising steak and a gentle oven cook to create a hearty meal with plenty of savoury gravy.

Serves and preparation time

Serves: 4

Preparation: 20 minutes

Cooking: 2–2½ hours

Ingredients

  • 700g braising steak, cut into 4 portions
  • 3 tablespoons plain flour
  • 1 teaspoon paprika
  • ½ teaspoon salt, plus extra to taste
  • ¼ teaspoon black pepper
  • 2 tablespoons vegetable oil
  • 1 large onion, thinly sliced
  • 1 green pepper, sliced
  • 2 carrots, peeled and diced
  • 2 garlic cloves, finely chopped
  • 400g tin chopped tomatoes
  • 250ml beef stock
  • 1 tablespoon Worcestershire sauce
  • 1 teaspoon dried thyme

Method

  1. Heat the oven to 160°C (140°C fan, Gas Mark 3).
  2. Mix the flour, paprika, salt and pepper on a plate. Lightly coat each piece of beef, then use a meat mallet or rolling pin to gently pound the flour into the meat. If the steak is already cut thinly, simply coat it in the seasoned flour.
  3. Heat the oil in a large, ovenproof casserole over a medium-high heat. Brown the beef in batches for 2–3 minutes on each side, adding a little more oil if needed. Transfer the browned pieces to a plate.
  4. Add the onion, pepper and carrots to the casserole. Cook for about 5 minutes, stirring, until they begin to soften. Stir in the garlic and cook for 30 seconds.
  5. Add the tomatoes, beef stock, Worcestershire sauce and thyme. Scrape the bottom of the casserole to loosen any browned bits, then return the beef and any juices to the pan. The liquid should mostly cover the meat; add a splash of water or stock if necessary.
  6. Bring the sauce to a gentle simmer. Cover the casserole and transfer it to the oven. Cook for 2–2½ hours, or until the beef is very tender. Check occasionally and add a little liquid if the sauce becomes too thick.
  7. Taste the sauce and adjust the seasoning before serving.

What to serve with Swiss steak

Serve Swiss steak with mashed potatoes, rice or buttered noodles to soak up the tomato gravy. Steamed green beans, cabbage or a simple green salad make good accompaniments.

Tips for tender, flavourful steak

  • Choose the right cut: Braising steak, such as chuck or blade, becomes tender during slow cooking and gives the sauce a full flavour.
  • Brown the beef well: A good sear adds depth to the finished sauce. Avoid crowding the pan; brown the meat in batches.
  • Keep the heat gentle: A slow, covered cook helps break down the tougher fibres. The sauce should simmer gently rather than boil hard.
  • Make it ahead: The flavour often improves after a night in the fridge. Cool leftovers promptly, refrigerate in a covered container and reheat thoroughly.


Deliciously Tender Swiss Steak: A Comforting and Versatile Recipe for Easy, Make-Ahead Meals

  1. Tender, slow-cooked beef
  2. Rich, savoury tomato gravy
  3. Simple, familiar ingredients
  4. Easy oven-braising method
  5. Great for make-ahead meals
  6. Comforting and filling
  7. Pairs well with mash or rice
  8. Easy to adapt with extra vegetables


Challenges of Preparing Traditional Swiss Steak: Time, Ingredients, and Taste Considerations

  1. Requires a long, slow cooking time.
  2. Needs a suitable cut of braising steak.
  3. Can be too rich for some tastes.
  4. Uses several ingredients and steps.

Tender, slow-cooked beef

Slow cooking is what makes Swiss steak so wonderfully tender. As the beef gently braises in the tomato-rich sauce, its tougher fibres gradually soften, leaving each piece succulent and easy to cut. The meat also absorbs the savoury flavours of the vegetables, herbs and stock, making every bite comforting and full of flavour.

Rich, savoury tomato gravy

The rich, savoury tomato gravy is one of the best things about Swiss steak. As the beef slowly braises, its juices mingle with the tomatoes, vegetables and herbs to create a deeply flavoured sauce that is both comforting and satisfying. Spoon it generously over the tender steak, mashed potatoes, rice or noodles to make the most of every drop.

Simple, familiar ingredients

Swiss steak is made with simple, familiar ingredients that are easy to find in most supermarkets, such as braising steak, onions, carrots, tinned tomatoes and stock. There is no need for specialist equipment or hard-to-source seasonings, making it an approachable recipe for a cosy midweek dinner or a relaxed weekend meal.

Easy oven-braising method

The oven-braising method makes Swiss steak easy to prepare: once the beef has been browned and the sauce assembled, simply cover the casserole and let it cook gently in the oven. The steady, even heat helps tenderise the meat and develop a rich sauce, while requiring little attention—leaving you free to prepare the rest of the meal.

Great for make-ahead meals

Swiss steak is ideal for make-ahead meals because its flavour deepens as it rests. Cook it a day in advance, let it cool, then cover and refrigerate. When you’re ready to eat, reheat it gently on the hob or in the oven until piping hot, adding a splash of stock or water if the sauce has thickened. It’s a convenient, comforting dinner for busy evenings.

Comforting and filling

Swiss steak is the kind of comforting, filling meal that feels right at the end of a long day. Slowly braised beef becomes tender and satisfying, while the rich tomato and vegetable sauce adds plenty of flavour. Serve it with mashed potatoes, rice or buttered noodles to make the most of the hearty gravy and turn this simple recipe into a nourishing family supper.

Pairs well with mash or rice

Swiss steak pairs beautifully with creamy mashed potatoes or fluffy rice, both of which soak up its rich tomato gravy. Choose mash for a comforting, hearty meal, or rice for a simple alternative that lets the tender beef and savoury sauce take centre stage.

Easy to adapt with extra vegetables

Swiss steak is easy to adapt with extra vegetables, making it a handy way to use what you have in the fridge. Add sliced mushrooms, celery, courgette or extra peppers to the pan, adjusting the quantity to suit your taste. Heartier vegetables can go in with the onions and carrots, while softer ones are best added later so they keep their shape. The vegetables cook slowly in the tomato and beef juices, adding colour, flavour and texture to the dish.

Requires a long, slow cooking time.

One drawback of Swiss steak is the long, slow cooking time. The beef needs to braise for around two to two and a half hours to become tender, so it is not the best choice when you need a quick meal. You’ll need to plan ahead, although most of the cooking is hands-off.

Needs a suitable cut of braising steak.

One drawback of Swiss steak is that it needs a suitable cut of braising steak, such as chuck or blade, to become tender during the long, slow cooking. Leaner or quicker-cooking cuts may turn dry or tough, while the right cut can sometimes be harder to find or more expensive.

Can be too rich for some tastes.

Swiss steak’s slow-cooked beef and rich tomato gravy can feel quite heavy, particularly when served with mashed potatoes or other hearty sides. If you prefer lighter flavours, use a leaner cut of beef, skim excess fat from the sauce and serve it with steamed vegetables or a crisp salad. Adding a little extra tomato or stock can also help balance the richness.

Uses several ingredients and steps.

One drawback of Swiss steak is that it takes several ingredients and steps to prepare. You’ll need to season and tenderise the beef, brown it, cook the vegetables and make the sauce before leaving everything to braise slowly. It’s not especially difficult, but it can feel time-consuming if you’re looking for a quick meal or a recipe with minimal washing-up.

Savoury Delights: Exploring Divine Potato Recipes for Every Palate

potato recipes

The Versatile Spud: Exploring Delicious Potato Recipes

Potatoes are a staple ingredient in many cuisines around the world, beloved for their versatility and ability to be transformed into a wide array of mouth-watering dishes. Whether mashed, roasted, or fried, potatoes never fail to satisfy our cravings for comfort food. Let’s delve into some delightful potato recipes that are sure to tantalise your taste buds.

Classic Roast Potatoes

To make the perfect roast potatoes, start by parboiling peeled and chopped potatoes until slightly tender. Drain and toss them in hot oil, then roast in the oven until crispy on the outside and fluffy on the inside. Season with salt, pepper, and herbs for a delectable side dish.

Creamy Mashed Potatoes

For creamy mashed potatoes, boil peeled potatoes until soft, then mash them with butter, milk, and seasoning until smooth and velvety. Top with a dollop of butter and fresh chives for an indulgent treat that pairs well with any main course.

Crispy Potato Rosti

Rosti is a Swiss dish made from grated potatoes that are pan-fried until golden and crispy. Add grated cheese or onions for extra flavour, then serve as a savoury breakfast or as a satisfying side dish alongside meats or salads.

Potato Gnocchi

Gnocchi are soft dumplings made from mashed potatoes, flour, and egg. These pillowy delights can be served with rich tomato sauce, creamy pesto, or browned butter for a comforting meal that is both simple and elegant.

Spicy Potato Wedges

Toss thick potato wedges in a mixture of spices like paprika, garlic powder, and cayenne pepper before baking them in the oven until crispy and golden brown. These spicy potato wedges make a delicious snack or side dish for any occasion.

Whether you prefer your potatoes roasted to perfection or mashed to creamy goodness, there is no shortage of delightful recipes to explore with this humble yet versatile vegetable. Get creative in the kitchen and discover new ways to enjoy the humble spud!


9 Essential Tips for Mastering Potato Recipes in the Kitchen

  1. Boil potatoes with their skin on to retain more nutrients.
  2. For crispy roast potatoes, parboil them before roasting.
  3. Use a mandoline slicer for evenly sliced potato gratin or chips.
  4. Add a pinch of turmeric when boiling potatoes for a vibrant colour.
  5. Incorporate mashed potatoes into bread dough for soft and fluffy bread rolls.
  6. Store raw potatoes in a cool, dark place to prevent sprouting.
  7. Make a creamy potato salad by mixing mayo with Dijon mustard and fresh herbs.
  8. Try making hassleback potatoes by thinly slicing them without cutting all the way through before baking.
  9. Experiment with different potato varieties like sweet potatoes or purple potatoes for unique dishes.

Boil potatoes with their skin on to retain more nutrients.

Boiling potatoes with their skin on is a simple yet effective tip to retain more nutrients in this versatile vegetable. The skin acts as a natural barrier, preventing water-soluble vitamins and minerals from leaching out during the cooking process. By keeping the skin intact, you preserve essential nutrients such as vitamin C, potassium, and fibre, ensuring that your potato dishes are not only delicious but also packed with goodness. So next time you prepare a potato recipe, consider leaving the skin on for an extra nutritional boost.

For crispy roast potatoes, parboil them before roasting.

For achieving perfectly crispy roast potatoes, a key tip is to parboil them before placing them in the oven. By partially cooking the peeled and chopped potatoes in boiling water, they become slightly tender, which helps create a crispier exterior when roasted. This method allows the potatoes to develop a golden and crunchy crust while remaining fluffy on the inside, resulting in a delightful texture that enhances the overall flavour of the dish.

Use a mandoline slicer for evenly sliced potato gratin or chips.

When preparing potato gratin or chips, a useful tip is to utilise a mandoline slicer for achieving uniformly sliced potatoes. The mandoline slicer ensures that each potato slice is of consistent thickness, leading to even cooking and a beautifully layered gratin or perfectly crispy chips. This handy kitchen tool not only saves time but also enhances the presentation and texture of your potato dishes, allowing you to create culinary delights that are both visually appealing and delicious.

Add a pinch of turmeric when boiling potatoes for a vibrant colour.

Enhance the visual appeal of your potato dishes by incorporating a simple yet effective tip: adding a pinch of turmeric to the boiling water. This small addition not only infuses the potatoes with a subtle earthy flavour but also imparts a vibrant golden hue to them. The result is not only visually striking but also adds an extra layer of depth to your culinary creations. Try this trick next time you boil potatoes for a colourful and appetising twist to your favourite recipes.

Incorporate mashed potatoes into bread dough for soft and fluffy bread rolls.

Elevate your bread-making game by incorporating mashed potatoes into your dough for irresistibly soft and fluffy bread rolls. The addition of mashed potatoes not only enhances the texture of the bread but also adds a subtle sweetness and richness that will take your homemade rolls to the next level. The result is a batch of freshly baked bread rolls that are tender, moist, and simply delicious. Give this tip a try to experience the delightful difference that mashed potatoes can make in your baking creations.

Store raw potatoes in a cool, dark place to prevent sprouting.

To ensure the longevity and quality of your raw potatoes, it is recommended to store them in a cool, dark place to prevent sprouting. Exposing potatoes to light can trigger the growth of unsightly sprouts, affecting their taste and texture. By keeping them in a cool and dark environment, such as a pantry or cellar, you can help maintain the freshness of your potatoes for longer periods, ensuring that they remain perfect for your delicious potato recipes.

Make a creamy potato salad by mixing mayo with Dijon mustard and fresh herbs.

Elevate your potato salad game by creating a creamy and flavourful dish with a simple twist. Combine mayonnaise with tangy Dijon mustard and fragrant fresh herbs to infuse your potato salad with a deliciously rich and zesty dressing. This combination adds a depth of flavour that complements the soft texture of the potatoes, resulting in a refreshing and satisfying side dish that is perfect for picnics, barbecues, or any meal where you want to impress with a classic favourite reinvented.

Try making hassleback potatoes by thinly slicing them without cutting all the way through before baking.

For a unique twist on potato recipes, consider trying hassleback potatoes. This method involves thinly slicing the potatoes without cutting all the way through, creating a accordion-like effect. By baking these sliced potatoes, you achieve a crispy exterior while keeping the inside soft and fluffy. The hassleback technique not only enhances the presentation of the dish but also allows for a delightful blend of textures and flavours in every bite. Give this creative approach a go to elevate your potato game and impress your guests with a visually stunning and delicious side dish.

Experiment with different potato varieties like sweet potatoes or purple potatoes for unique dishes.

When exploring potato recipes, consider experimenting with various potato varieties, such as sweet potatoes or purple potatoes, to add a unique twist to your dishes. Sweet potatoes offer a naturally sweet flavour and are packed with nutrients, making them a versatile ingredient in both savoury and sweet recipes. Purple potatoes, on the other hand, bring vibrant colour and a slightly nutty taste to dishes, adding visual appeal and an interesting flavour profile. By incorporating different potato varieties into your cooking, you can create innovative and exciting dishes that showcase the diverse possibilities of this humble vegetable.