Easy Swiss Steak Recipe: Tender Beef in Rich Tomato Gravy
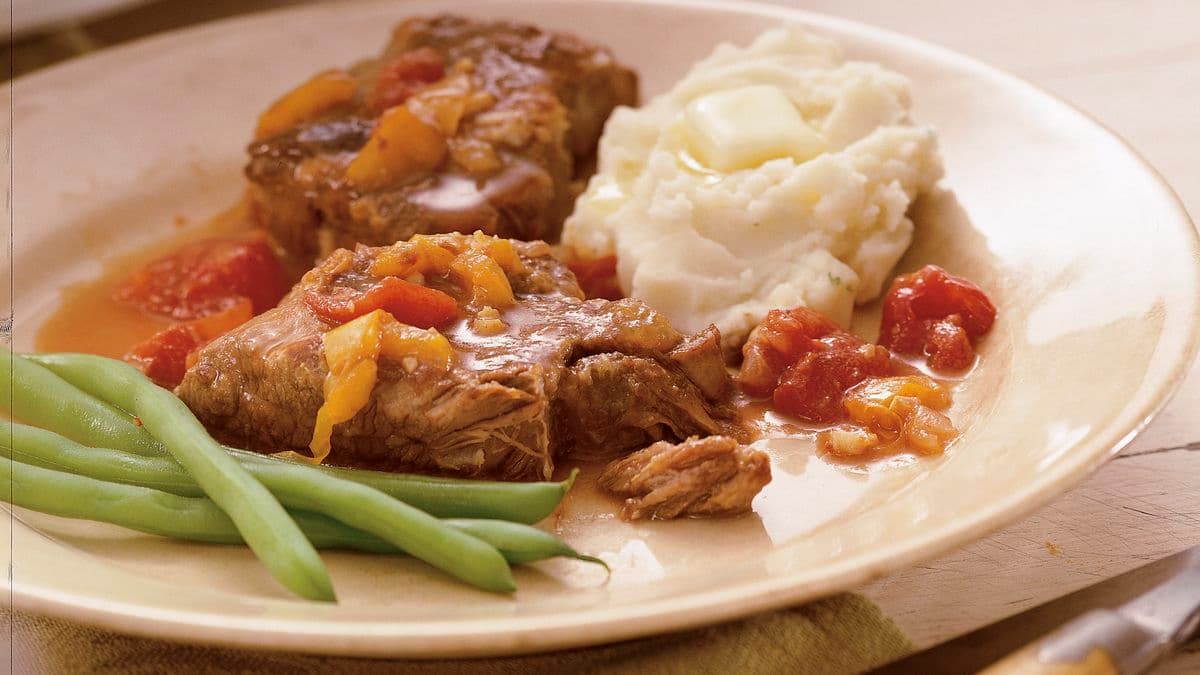
swiss steak recipe

Swiss Steak Recipe

Swiss steak is a comforting dish of tenderised beef slowly braised in a rich tomato and vegetable sauce. Despite its name, it is not a Swiss dish: “swissing” refers to a method of tenderising meat by pounding or rolling it. This straightforward version uses braising steak and a gentle oven cook to create a hearty meal with plenty of savoury gravy.

Serves and preparation time

Serves: 4

Preparation: 20 minutes

Cooking: 2–2½ hours

Ingredients

  • 700g braising steak, cut into 4 portions
  • 3 tablespoons plain flour
  • 1 teaspoon paprika
  • ½ teaspoon salt, plus extra to taste
  • ¼ teaspoon black pepper
  • 2 tablespoons vegetable oil
  • 1 large onion, thinly sliced
  • 1 green pepper, sliced
  • 2 carrots, peeled and diced
  • 2 garlic cloves, finely chopped
  • 400g tin chopped tomatoes
  • 250ml beef stock
  • 1 tablespoon Worcestershire sauce
  • 1 teaspoon dried thyme

Method

  1. Heat the oven to 160°C (140°C fan, Gas Mark 3).
  2. Mix the flour, paprika, salt and pepper on a plate. Lightly coat each piece of beef, then use a meat mallet or rolling pin to gently pound the flour into the meat. If the steak is already cut thinly, simply coat it in the seasoned flour.
  3. Heat the oil in a large, ovenproof casserole over a medium-high heat. Brown the beef in batches for 2–3 minutes on each side, adding a little more oil if needed. Transfer the browned pieces to a plate.
  4. Add the onion, pepper and carrots to the casserole. Cook for about 5 minutes, stirring, until they begin to soften. Stir in the garlic and cook for 30 seconds.
  5. Add the tomatoes, beef stock, Worcestershire sauce and thyme. Scrape the bottom of the casserole to loosen any browned bits, then return the beef and any juices to the pan. The liquid should mostly cover the meat; add a splash of water or stock if necessary.
  6. Bring the sauce to a gentle simmer. Cover the casserole and transfer it to the oven. Cook for 2–2½ hours, or until the beef is very tender. Check occasionally and add a little liquid if the sauce becomes too thick.
  7. Taste the sauce and adjust the seasoning before serving.

What to serve with Swiss steak

Serve Swiss steak with mashed potatoes, rice or buttered noodles to soak up the tomato gravy. Steamed green beans, cabbage or a simple green salad make good accompaniments.

Tips for tender, flavourful steak

  • Choose the right cut: Braising steak, such as chuck or blade, becomes tender during slow cooking and gives the sauce a full flavour.
  • Brown the beef well: A good sear adds depth to the finished sauce. Avoid crowding the pan; brown the meat in batches.
  • Keep the heat gentle: A slow, covered cook helps break down the tougher fibres. The sauce should simmer gently rather than boil hard.
  • Make it ahead: The flavour often improves after a night in the fridge. Cool leftovers promptly, refrigerate in a covered container and reheat thoroughly.


Deliciously Tender Swiss Steak: A Comforting and Versatile Recipe for Easy, Make-Ahead Meals

  1. Tender, slow-cooked beef
  2. Rich, savoury tomato gravy
  3. Simple, familiar ingredients
  4. Easy oven-braising method
  5. Great for make-ahead meals
  6. Comforting and filling
  7. Pairs well with mash or rice
  8. Easy to adapt with extra vegetables


Challenges of Preparing Traditional Swiss Steak: Time, Ingredients, and Taste Considerations

  1. Requires a long, slow cooking time.
  2. Needs a suitable cut of braising steak.
  3. Can be too rich for some tastes.
  4. Uses several ingredients and steps.

Tender, slow-cooked beef

Slow cooking is what makes Swiss steak so wonderfully tender. As the beef gently braises in the tomato-rich sauce, its tougher fibres gradually soften, leaving each piece succulent and easy to cut. The meat also absorbs the savoury flavours of the vegetables, herbs and stock, making every bite comforting and full of flavour.

Rich, savoury tomato gravy

The rich, savoury tomato gravy is one of the best things about Swiss steak. As the beef slowly braises, its juices mingle with the tomatoes, vegetables and herbs to create a deeply flavoured sauce that is both comforting and satisfying. Spoon it generously over the tender steak, mashed potatoes, rice or noodles to make the most of every drop.

Simple, familiar ingredients

Swiss steak is made with simple, familiar ingredients that are easy to find in most supermarkets, such as braising steak, onions, carrots, tinned tomatoes and stock. There is no need for specialist equipment or hard-to-source seasonings, making it an approachable recipe for a cosy midweek dinner or a relaxed weekend meal.

Easy oven-braising method

The oven-braising method makes Swiss steak easy to prepare: once the beef has been browned and the sauce assembled, simply cover the casserole and let it cook gently in the oven. The steady, even heat helps tenderise the meat and develop a rich sauce, while requiring little attention—leaving you free to prepare the rest of the meal.

Great for make-ahead meals

Swiss steak is ideal for make-ahead meals because its flavour deepens as it rests. Cook it a day in advance, let it cool, then cover and refrigerate. When you’re ready to eat, reheat it gently on the hob or in the oven until piping hot, adding a splash of stock or water if the sauce has thickened. It’s a convenient, comforting dinner for busy evenings.

Comforting and filling

Swiss steak is the kind of comforting, filling meal that feels right at the end of a long day. Slowly braised beef becomes tender and satisfying, while the rich tomato and vegetable sauce adds plenty of flavour. Serve it with mashed potatoes, rice or buttered noodles to make the most of the hearty gravy and turn this simple recipe into a nourishing family supper.

Pairs well with mash or rice

Swiss steak pairs beautifully with creamy mashed potatoes or fluffy rice, both of which soak up its rich tomato gravy. Choose mash for a comforting, hearty meal, or rice for a simple alternative that lets the tender beef and savoury sauce take centre stage.

Easy to adapt with extra vegetables

Swiss steak is easy to adapt with extra vegetables, making it a handy way to use what you have in the fridge. Add sliced mushrooms, celery, courgette or extra peppers to the pan, adjusting the quantity to suit your taste. Heartier vegetables can go in with the onions and carrots, while softer ones are best added later so they keep their shape. The vegetables cook slowly in the tomato and beef juices, adding colour, flavour and texture to the dish.

Requires a long, slow cooking time.

One drawback of Swiss steak is the long, slow cooking time. The beef needs to braise for around two to two and a half hours to become tender, so it is not the best choice when you need a quick meal. You’ll need to plan ahead, although most of the cooking is hands-off.

Needs a suitable cut of braising steak.

One drawback of Swiss steak is that it needs a suitable cut of braising steak, such as chuck or blade, to become tender during the long, slow cooking. Leaner or quicker-cooking cuts may turn dry or tough, while the right cut can sometimes be harder to find or more expensive.

Can be too rich for some tastes.

Swiss steak’s slow-cooked beef and rich tomato gravy can feel quite heavy, particularly when served with mashed potatoes or other hearty sides. If you prefer lighter flavours, use a leaner cut of beef, skim excess fat from the sauce and serve it with steamed vegetables or a crisp salad. Adding a little extra tomato or stock can also help balance the richness.

Uses several ingredients and steps.

One drawback of Swiss steak is that it takes several ingredients and steps to prepare. You’ll need to season and tenderise the beef, brown it, cook the vegetables and make the sauce before leaving everything to braise slowly. It’s not especially difficult, but it can feel time-consuming if you’re looking for a quick meal or a recipe with minimal washing-up.


Classic Cottage Pie Recipe: A Comforting British Family Favourite

cottage pie recipe

Classic Cottage Pie Recipe

Cottage pie is a comforting British favourite: savoury minced beef cooked with vegetables in a rich gravy, then topped with creamy mashed potato and baked until golden. It is often confused with shepherd’s pie, but the traditional distinction is simple: cottage pie is made with beef, while shepherd’s pie is made with lamb.

This recipe serves four to six and is ideal for a relaxed family meal. It can also be made ahead and baked when you are ready to eat.

Preparation and cooking time

  • Preparation: 25 minutes
  • Cooking: 50 minutes
  • Serves: 4–6

Ingredients

For the filling

  • 1 tablespoon vegetable oil
  • 1 onion, finely chopped
  • 2 carrots, diced
  • 500g beef mince
  • 2 tablespoons tomato purée
  • 1 tablespoon plain flour
  • 1 teaspoon Worcestershire sauce
  • 400ml beef stock
  • 100g frozen peas
  • 1 teaspoon dried thyme, or a few fresh sprigs
  • Salt and freshly ground black pepper

For the potato topping

  • 900g floury potatoes, such as Maris Piper or King Edward, peeled and cut into chunks
  • 50g butter
  • About 100ml milk, warmed
  • 50g mature Cheddar, grated (optional)
  • Salt and freshly ground black pepper

Method

  1. Cook the potatoes. Put the potatoes in a large pan of cold, salted water. Bring to the boil, then simmer for 15–20 minutes, or until tender. Drain well and leave them to steam-dry for a minute.
  2. Make the filling. Meanwhile, heat the oil in a large frying pan or saucepan over a medium heat. Add the onion and carrots and cook for 6–8 minutes, stirring occasionally, until softened.
  3. Add the beef mince and cook for 5–7 minutes, breaking it up with a spoon, until browned. Stir in the tomato purée and flour and cook for a minute.
  4. Pour in the beef stock and add the Worcestershire sauce and thyme. Stir well, bring to a gentle simmer and cook for 20–25 minutes, until the sauce has thickened. Stir in the peas for the final few minutes. Season to taste.
  5. Mash the potatoes. Mash the drained potatoes with the butter and enough warm milk to make a smooth, fluffy mash. Season with salt and pepper. Stir in the grated Cheddar, if using.
  6. Assemble the pie. Heat the oven to 200°C (180°C fan)/400°F/gas mark 6. Spoon the beef filling into an ovenproof dish. Spread the mash evenly over the top, taking it right to the edges. Roughen the surface with a fork to help it turn golden.
  7. Bake. Place the dish on a baking tray and bake for 25–30 minutes, until bubbling around the edges and golden on top. Leave it to stand for 5 minutes before serving.

Tips for a delicious cottage pie

  • Allow the filling to simmer until thick. If it is too runny, the potato topping may sink into it.
  • For extra flavour, add a splash of red wine with the stock, or stir in a teaspoon of mustard.
  • Make the topping crispier by brushing it with a little melted butter before baking.
  • Serve with steamed greens, cabbage or green beans.

Make-ahead and storage

The filling can be prepared a day ahead and kept covered in the fridge. Assemble the pie once the filling has cooled, then refrigerate it until needed. Add a little extra baking time if cooking it straight from the fridge, and make sure it is piping hot all the way through.

Leftovers can be stored in a covered container in the fridge for up to three days. Reheat thoroughly until steaming hot. Cottage pie can also be frozen; for the best texture, freeze it before baking, then defrost it in the fridge before cooking.


Everything You Need to Know About Making the Perfect Cottage Pie: FAQs Answered

  1. What is the difference between cottage pie and shepherd’s pie?
  2. What ingredients do you need to make cottage pie?
  3. How do you make the mashed potato topping creamy?
  4. How long should cottage pie bake in the oven?
  5. Can you make cottage pie ahead of time?
  6. Can cottage pie be frozen?
  7. How do you stop cottage pie filling from becoming watery?
  8. What should you serve with cottage pie?

What is the difference between cottage pie and shepherd’s pie?

The main difference between cottage pie and shepherd’s pie is the meat: cottage pie is traditionally made with minced beef, while shepherd’s pie uses minced lamb. Both are topped with mashed potato and baked until golden, and their fillings often include vegetables, gravy and herbs.

What ingredients do you need to make cottage pie?

To make cottage pie, you’ll need beef mince, onion, carrots, peas, beef stock, tomato purée, Worcestershire sauce and a little flour to thicken the filling. Season it with salt, pepper and thyme, then top with mashed potatoes made from floury potatoes, butter and milk. Mature Cheddar is optional, but adds a savoury finish to the topping.

How do you make the mashed potato topping creamy?

For a creamy mashed potato topping, use floury potatoes such as Maris Piper or King Edward, and cook them until completely tender. Drain them well and let them steam-dry briefly, then mash while hot with butter and warm milk, adding the milk gradually until the mash is smooth and fluffy. Avoid overworking the potatoes, as this can make them gluey. Season well, and stir in a little grated Cheddar or a spoonful of cream for extra richness, if you like.

How long should cottage pie bake in the oven?

Cottage pie should usually bake in a preheated oven at 200°C (180°C fan)/400°F/gas mark 6 for 25–30 minutes, until the filling is bubbling around the edges and the potato topping is golden. If the pie has been chilled, allow a little extra time and check that it is piping hot all the way through before serving.

Can you make cottage pie ahead of time?

Yes, cottage pie is ideal for making ahead. Prepare the filling and mashed potato, assemble the pie, then cover and refrigerate it for up to 24 hours before baking. You can also bake it in advance and reheat it until piping hot throughout. If baking straight from the fridge, allow a little extra time in the oven, and check that the centre is thoroughly heated before serving.

Can cottage pie be frozen?

Yes, cottage pie freezes well. For the best results, let it cool completely, then cover it tightly or transfer it to a freezer-safe container and freeze for up to three months. You can freeze it before or after baking, though freezing before baking usually gives the potato topping a better texture. Defrost overnight in the fridge, then bake until piping hot throughout. If reheating a cooked pie, make sure it is thoroughly hot before serving.

How do you stop cottage pie filling from becoming watery?

To stop cottage pie filling from becoming watery, simmer it uncovered until the sauce has reduced and thickened before adding it to the baking dish. A little plain flour stirred into the browned mince can help, too. Avoid adding too much stock, and let frozen vegetables thaw and drain before using them. The filling should be moist but not runny; if it looks thin, cook it for a few more minutes before topping with mash.

What should you serve with cottage pie?

Cottage pie pairs beautifully with simple vegetables that balance its rich, savoury filling. Try serving it with steamed green beans, peas, broccoli or cabbage, or add roasted carrots for extra sweetness. A crisp green salad can make the meal feel lighter, while a little extra gravy is always welcome.

Traditional Shepherd’s Pie Recipe: A Taste of British Comfort

shepherd's pie recipe

The Classic Shepherd’s Pie Recipe

Shepherd’s Pie is a comforting and hearty dish that has been a favourite in British households for generations. Made with minced lamb or beef, topped with creamy mashed potatoes, this dish is the epitome of comfort food.

Ingredients:

  • 500g minced lamb or beef
  • 1 onion, finely chopped
  • 2 carrots, diced
  • 2 cloves of garlic, minced
  • 400g tin of chopped tomatoes
  • 200ml beef stock
  • 1 tbsp Worcestershire sauce
  • Salt and pepper to taste
  • 900g potatoes, peeled and chopped
  • 50g butter
  • 100ml milk

Instructions:

  1. In a large pan, brown the minced meat over medium heat. Add the onions, carrots, and garlic, and cook until softened.
  2. Pour in the chopped tomatoes and beef stock. Add Worcestershire sauce, salt, and pepper. Simmer for 20-30 minutes until the mixture thickens.


Five Essential Tips for the Perfect Shepherd’s Pie

  1. Use minced lamb for a traditional shepherd’s pie flavour.
  2. Add Worcestershire sauce for an extra depth of flavour.
  3. Top the pie with creamy mashed potatoes for a comforting finish.
  4. Include finely chopped carrots and peas in the filling for added texture and nutrients.
  5. Bake the shepherd’s pie until the top is golden brown and crispy.

Use minced lamb for a traditional shepherd’s pie flavour.

For an authentic and traditional taste in your shepherd’s pie, opt for minced lamb as the key ingredient. Minced lamb brings a rich and distinctive flavour that is synonymous with classic shepherd’s pie recipes. The unique savour of lamb adds depth to the dish, enhancing its overall appeal and making each bite a delightful experience. Choose minced lamb to capture the true essence of this beloved British comfort food.

Add Worcestershire sauce for an extra depth of flavour.

For an extra depth of flavour in your Shepherd’s Pie, consider adding Worcestershire sauce to the meat mixture. This classic condiment enhances the savoury profile of the dish, adding a rich and tangy note that complements the minced lamb or beef perfectly. Just a tablespoon of Worcestershire sauce can elevate the overall taste and make your Shepherd’s Pie even more delicious and satisfying.

Top the pie with creamy mashed potatoes for a comforting finish.

To enhance the comforting appeal of your shepherd’s pie, ensure to top it with a generous layer of creamy mashed potatoes. This final touch not only adds a velvety texture to the dish but also creates a satisfying and homely finish that perfectly complements the savoury meat filling. The creamy mashed potatoes provide a delightful contrast to the rich flavours below, making each bite a truly comforting experience.

Include finely chopped carrots and peas in the filling for added texture and nutrients.

For an extra layer of texture and nutrients in your shepherd’s pie, consider adding finely chopped carrots and peas to the filling. Not only do these colourful vegetables enhance the visual appeal of the dish, but they also provide a boost of vitamins and fibre. The carrots add a subtle sweetness, while the peas contribute a pop of freshness, creating a well-balanced and wholesome filling that complements the savoury meat perfectly.

Bake the shepherd’s pie until the top is golden brown and crispy.

For a perfect finishing touch to your shepherd’s pie, bake it in the oven until the top is beautifully golden brown and crispy. This not only adds a delightful crunch to each bite but also enhances the visual appeal of the dish. The contrast between the creamy mashed potatoes and the crispy top creates a textural sensation that will have your taste buds dancing with joy. Be sure to keep an eye on it while baking to achieve that ideal balance of crispiness without burning.

Delicious Ground Turkey Recipes to Elevate Your Culinary Experience

ground turkey recipes

The Versatility of Ground Turkey: Delicious Recipes to Try

Ground turkey is a lean and flavourful alternative to beef that can be used in a variety of dishes. Whether you’re looking to cut down on red meat or simply want to try something different, ground turkey is a versatile ingredient that can be the star of many delicious meals. Here are some mouth-watering recipes to inspire your next culinary adventure:

Turkey Meatballs in Marinara Sauce

These tender turkey meatballs simmered in a rich marinara sauce are a comforting and satisfying meal. Serve them over pasta or with crusty bread for a hearty dinner that the whole family will love.

Turkey Taco Lettuce Wraps

For a lighter twist on traditional tacos, try filling crisp lettuce leaves with seasoned ground turkey, fresh salsa, avocado slices, and a dollop of sour cream. These taco lettuce wraps are not only delicious but also low-carb and packed with flavour.

Turkey Stuffed Peppers

Bell peppers stuffed with a savoury mixture of ground turkey, rice, tomatoes, and spices make for a colourful and nutritious meal. Baked until tender and topped with melted cheese, these stuffed peppers are sure to become a favourite in your recipe rotation.

Spicy Turkey Burgers

Elevate your burger game by swapping beef for seasoned ground turkey patties. Add some heat with jalapeños or sriracha sauce for an extra kick of flavour. Serve these spicy turkey burgers on toasted buns with your favourite toppings for a delicious twist on a classic.

With these creative and tasty recipes, you can explore the endless possibilities of cooking with ground turkey. Whether you’re craving comfort food or looking for healthier alternatives, ground turkey is sure to delight your taste buds and inspire you to get creative in the kitchen.


Top 5 FAQs on Cooking with Ground Turkey: Seasoning, Substitutions, and Kid-Friendly Recipes

  1. 1. How do I season ground turkey for recipes?
  2. 2. What are some healthy ground turkey recipe options?
  3. 3. Can I substitute ground turkey for beef in recipes?
  4. 4. How do I cook ground turkey to ensure it stays moist and flavourful?
  5. 5. What are some popular ground turkey recipes that kids would enjoy?

1. How do I season ground turkey for recipes?

Seasoning ground turkey is essential to enhance its flavour and create delicious recipes. To season ground turkey effectively, start by incorporating a mix of herbs and spices such as garlic powder, onion powder, paprika, cumin, oregano, and thyme. Salt and pepper are also key seasonings that help bring out the natural taste of the turkey. Experiment with different flavour profiles by adding ingredients like Worcestershire sauce, soy sauce, chili flakes, or fresh herbs like parsley or cilantro. Remember to taste the seasoned mixture before cooking to adjust the seasoning levels according to your preference. By taking the time to season ground turkey thoughtfully, you can elevate your dishes and enjoy a burst of delicious flavours in every bite.

2. What are some healthy ground turkey recipe options?

When looking for healthy options using ground turkey, there are plenty of delicious recipes to choose from. You can try making turkey lettuce wraps filled with fresh veggies and herbs for a light and nutritious meal. Another great option is turkey chili packed with protein and fibre from beans and vegetables. For a low-carb alternative, consider making turkey zucchini boats filled with a flavourful mixture of turkey, spices, and cheese. These recipes not only offer a healthier twist on traditional dishes but also showcase the versatility of ground turkey in creating satisfying meals that are both tasty and good for you.

3. Can I substitute ground turkey for beef in recipes?

When it comes to substituting ground turkey for beef in recipes, the answer is a resounding yes. Ground turkey is a versatile and healthy alternative to beef that can be used in various dishes, from meatballs to burgers to tacos. While the flavour and texture may differ slightly, ground turkey can easily replace beef in most recipes with delicious results. Just be mindful of the leaner nature of ground turkey, which may require adjustments in cooking time and seasoning to ensure a tasty outcome. Whether you’re looking to reduce your red meat intake or simply try something new, swapping ground turkey for beef opens up a world of culinary possibilities.

4. How do I cook ground turkey to ensure it stays moist and flavourful?

When cooking ground turkey to maintain its moisture and flavour, there are a few key tips to keep in mind. Firstly, consider using lean ground turkey with a slightly higher fat content to prevent dryness. Cooking the turkey over medium heat and avoiding overcooking can help retain its juiciness. Incorporating ingredients like onions, garlic, herbs, or spices while cooking can enhance the flavour profile. Additionally, adding a splash of broth or sauce during the cooking process can help keep the ground turkey moist. By following these guidelines and experimenting with different seasonings, you can ensure that your ground turkey dishes are both succulent and delicious.

When it comes to popular ground turkey recipes that kids would enjoy, there are several delicious options to consider. Turkey meatballs with a tangy marinara sauce, turkey taco lettuce wraps filled with fresh toppings, turkey-stuffed peppers bursting with flavour, and spicy turkey burgers for a fun twist on a classic are all kid-friendly choices that combine the lean protein of ground turkey with exciting flavours and textures. These recipes not only appeal to children’s taste buds but also provide a nutritious and satisfying meal option that the whole family can enjoy together.

Savour the Flavour: A Delectable Brisket Recipe for Your Next Feast

brisket recipe

The Perfect Brisket Recipe for a Delicious Meal

Brisket is a classic dish that never fails to impress with its tender texture and rich flavour. Whether you’re hosting a family gathering or simply craving a hearty meal, this brisket recipe is sure to satisfy your taste buds.

Ingredients:

  • 1 4-5 pound beef brisket
  • 2 tablespoons olive oil
  • 1 onion, chopped
  • 4 cloves garlic, minced
  • 2 cups beef broth
  • 1 cup red wine
  • 2 tablespoons Worcestershire sauce
  • Salt and pepper to taste
  • Fresh herbs for garnish (optional)

Instructions:

  1. Preheat your oven to 160°C.
  2. In a large oven-safe pot or Dutch oven, heat the olive oil over medium-high heat. Sear the brisket on all sides until browned, then remove from the pot and set aside.
  3. Add the chopped onion and garlic to the pot and sauté until softened.
  4. Pour in the beef broth, red wine, and Worcestershire sauce. Season with salt and pepper.
  5. Add the seared brisket back into the pot. Cover with a lid or foil.
  6. lI>Bake in the preheated oven for about 3-4 hours, or until the brisket is fork-tender.lI

    lIemove from the oven and let it rest for 10-15 minutes before slicing.lI

    Serve the brisket slices with the cooking liquid spooned over them.lI

    Garnish with fresh herbs if desired.l

Enjoy this mouth-watering brisket recipe with your favourite sides for a memorable dining experience!l


Top 6 FAQs for Perfecting Your Brisket Recipe

  1. 1. How long does it take to cook brisket?
  2. 2. What is the best way to season brisket?
  3. 3. Can I cook brisket in a slow cooker?
  4. 4. Should I trim the fat off the brisket before cooking?
  5. 5. What temperature should I set my oven for cooking brisket?
  6. 6. How do I know when the brisket is done cooking?

1. How long does it take to cook brisket?

When cooking brisket, the duration can vary depending on the cooking method chosen. Typically, a beef brisket needs to be cooked low and slow to achieve that melt-in-your-mouth tenderness. On average, it can take around 3-4 hours in the oven at 160°C for a 4-5 pound brisket to become fork-tender. However, some recipes may call for longer cooking times if using a smoker or slow cooker. The key is to cook the brisket until it reaches the desired level of doneness and can easily be shredded or sliced for serving. Patience is essential when preparing this delectable dish to ensure a flavoursome outcome that will delight your taste buds.

2. What is the best way to season brisket?

When it comes to seasoning brisket, the best way is to keep it simple yet flavourful. A classic combination of salt, pepper, and garlic powder works wonders in enhancing the natural taste of the beef. You can also experiment with adding paprika, onion powder, or even a hint of cayenne for a kick of heat. The key is to generously coat the brisket with your chosen seasonings, ensuring that every inch is covered for a well-balanced flavour profile. Remember to let the brisket sit with the seasonings for some time before cooking to allow the flavours to penetrate the meat effectively.

3. Can I cook brisket in a slow cooker?

Cooking brisket in a slow cooker is a popular method that many home cooks swear by for achieving tender and flavourful results. The slow, low-temperature cooking process allows the brisket to become incredibly succulent and easy to shred. By placing the brisket in a slow cooker along with your choice of seasonings and liquids, you can let it simmer gently for hours until it reaches the desired level of tenderness. This convenient cooking technique is perfect for busy individuals who want to enjoy a delicious brisket meal without constant monitoring.

4. Should I trim the fat off the brisket before cooking?

When preparing a brisket recipe, the decision to trim the fat off the brisket before cooking is a matter of personal preference and cooking style. Some chefs believe that leaving a layer of fat on the brisket can enhance the flavour and juiciness of the meat during cooking, while others prefer to trim excess fat for a leaner end result. Ultimately, whether you choose to trim the fat or not depends on your desired level of tenderness and richness in the final dish. It’s recommended to consider your own taste preferences and cooking techniques when making this decision.

5. What temperature should I set my oven for cooking brisket?

When cooking brisket in the oven, it is recommended to set the temperature to around 160°C (320°F). This moderate heat allows the brisket to cook slowly and evenly, resulting in a tender and flavourful dish. By cooking the brisket at this temperature for several hours, you can achieve the perfect texture and ensure that the meat is cooked to perfection. Remember to cover the brisket while baking to retain moisture and enhance its succulence.

6. How do I know when the brisket is done cooking?

Knowing when a brisket is done cooking is crucial to achieving the perfect texture and flavour. A common indicator of doneness is the tenderness of the meat. You can test this by inserting a fork or meat thermometer into the thickest part of the brisket. If it easily slides in and out with little resistance, the brisket is likely done. Another method is to check for the internal temperature, which should reach around 93°C for a well-cooked brisket. Additionally, the meat should have a rich aroma and a caramelised exterior when fully cooked. By paying attention to these cues, you can ensure that your brisket is cooked to perfection every time.

Delicious Homemade Barbecue Sauce Recipe for Your Grilling Delights

barbecue sauce recipe

The Perfect BBQ Sauce Recipe for Your Grilling Adventures

One of the essential elements of a successful barbecue is the sauce that coats your meats, adding flavour and depth to every bite. Making your own BBQ sauce at home is not only easy but also allows you to customise it to suit your taste preferences. Here’s a delicious recipe for a classic barbecue sauce that will elevate your grilling game:

Ingredients:

  • 1 cup ketchup
  • 1/2 cup brown sugar
  • 1/4 cup apple cider vinegar
  • 2 tablespoons Worcestershire sauce
  • 1 tablespoon Dijon mustard
  • 1 teaspoon garlic powder
  • 1 teaspoon onion powder
  • Salt and pepper to taste

Instructions:

  1. In a saucepan, combine the ketchup, brown sugar, apple cider vinegar, Worcestershire sauce, Dijon mustard, garlic powder, and onion powder.
  2. Cook over medium heat, stirring occasionally, until the mixture comes to a simmer.
  3. Reduce the heat to low and let the sauce simmer for about 10-15 minutes, allowing the flavours to meld together.
  4. Taste the sauce and adjust the seasoning with salt and pepper according to your preference.
  5. Your homemade BBQ sauce is now ready to be slathered on ribs, chicken, or burgers during your next grilling session. Store any leftover sauce in an airtight container in the refrigerator for up to a week.

Experiment with additional ingredients such as honey for sweetness or cayenne pepper for heat to create your signature barbecue sauce. Whether you prefer tangy or sweet flavours, this versatile recipe can be adapted to suit any palate. Enjoy!


7 Benefits of a Homemade Barbecue Sauce Recipe for Flavourful Grilling

  1. Enhances the flavour of grilled meats and vegetables
  2. Allows for customisation to suit personal taste preferences
  3. Simple and easy to make at home with basic ingredients
  4. Adds a delicious finishing touch to barbecue dishes
  5. Provides a tangy, sweet, or spicy element to your meals
  6. Can be stored for future use, making meal prep convenient
  7. Offers versatility in pairing with various grilled foods


Challenges of Crafting the Perfect Homemade Barbecue Sauce

  1. Homemade barbecue sauce can be time-consuming to prepare, especially if you prefer a more complex flavour profile.
  2. Some ingredients required for BBQ sauce may not be readily available in all households, leading to additional shopping trips.
  3. Adjusting the seasoning of homemade BBQ sauce to achieve the perfect balance of flavours can be challenging for inexperienced cooks.

Enhances the flavour of grilled meats and vegetables

Indulge your taste buds with the delectable enhancement that homemade barbecue sauce brings to your grilled meats and vegetables. This flavourful concoction adds a tantalising depth to every bite, elevating the natural goodness of your favourite grilled dishes. Whether generously brushed over succulent meats or drizzled on charred vegetables, this versatile sauce is sure to delight your palate and take your BBQ experience to a whole new level.

Allows for customisation to suit personal taste preferences

The beauty of making your own barbecue sauce at home lies in its versatility, allowing you to tailor the flavours to perfectly match your personal taste preferences. By adjusting the levels of sweetness, tanginess, spiciness, or smokiness, you can create a customised sauce that complements your grilled meats just the way you like it. Whether you prefer a sweeter profile with a hint of heat or a tangy and robust sauce, the ability to customise every ingredient ensures that your barbecue experience is truly tailored to your liking.

Simple and easy to make at home with basic ingredients

Creating your own barbecue sauce at home is a delightful experience, thanks to its simplicity and ease of preparation using basic ingredients. With just a few pantry staples like ketchup, brown sugar, vinegar, and spices, you can whip up a delicious sauce that enhances the flavour of your grilled dishes. This accessible recipe empowers you to customise the sauce to your liking while ensuring a homemade touch that elevates your barbecue to a whole new level.

Adds a delicious finishing touch to barbecue dishes

Enhancing the flavour profile of grilled meats and vegetables, a homemade barbecue sauce serves as the perfect finishing touch to elevate your barbecue dishes. Its rich and tangy notes complement the smoky essence of barbecued fare, adding a layer of depth and complexity that tantalises the taste buds. Whether brushed onto ribs, drizzled over burgers, or used as a dipping sauce for chicken skewers, the addition of this delectable condiment enhances the overall dining experience, turning a simple meal into a culinary delight that is sure to impress guests and family alike.

Provides a tangy, sweet, or spicy element to your meals

Elevate your meals with the versatile barbecue sauce recipe that offers a delightful blend of tangy, sweet, or spicy flavours. Whether you crave a zesty kick, a hint of sweetness, or a fiery heat, this sauce has got you covered. With just a drizzle or generous slather of this homemade concoction, your dishes will be transformed into mouth-watering delights that tantalize your taste buds with every bite.

Can be stored for future use, making meal prep convenient

By preparing your own barbecue sauce using this recipe, you can enjoy the convenience of storing it for future use, simplifying meal prep and saving time in the kitchen. Having a batch of homemade BBQ sauce readily available allows you to effortlessly enhance the flavour of your grilled dishes whenever needed. Simply store the sauce in an airtight container in the refrigerator, and you’ll have a delicious condiment on hand to elevate your meals with minimal effort. This added convenience ensures that you can enjoy the rich flavours of homemade barbecue sauce whenever cravings strike, making cooking and meal planning a breeze.

Offers versatility in pairing with various grilled foods

The beauty of this barbecue sauce recipe lies in its versatility, offering a perfect complement to a wide range of grilled foods. Whether you’re grilling succulent ribs, juicy chicken, or flavourful burgers, this sauce enhances the taste of each dish with its rich and tangy flavour profile. Its adaptability allows it to pair seamlessly with different meats and vegetables, making it a go-to condiment for all your grilling adventures. With this sauce in your culinary arsenal, you can effortlessly elevate the taste of any grilled dish and delight your taste buds with each bite.

Homemade barbecue sauce can be time-consuming to prepare, especially if you prefer a more complex flavour profile.

Creating your own homemade barbecue sauce can be a time-consuming process, particularly if you are aiming for a more intricate and nuanced flavour profile. The careful selection and combination of various ingredients, along with the simmering and blending process, can require a significant amount of time and effort. However, the end result is often well worth the investment, as the depth of flavour and personal touch that comes with homemade barbecue sauce can truly elevate your grilling experience to a whole new level.

Some ingredients required for BBQ sauce may not be readily available in all households, leading to additional shopping trips.

When preparing a barbecue sauce from scratch, one potential drawback is that some of the ingredients needed may not be commonly found in every household pantry. This can result in the need for additional shopping trips to acquire items such as Worcestershire sauce, Dijon mustard, or apple cider vinegar. While these ingredients enhance the flavour profile of the sauce, their availability may vary, requiring extra effort to source them before embarking on the recipe. Despite this inconvenience, the end result of a homemade barbecue sauce is often well worth the extra steps taken to gather all the necessary components.

Adjusting the seasoning of homemade BBQ sauce to achieve the perfect balance of flavours can be challenging for inexperienced cooks.

Achieving the ideal balance of flavours in homemade BBQ sauce by adjusting the seasoning can present a challenge for inexperienced cooks. The intricate interplay of sweet, tangy, spicy, and savoury elements requires a delicate touch and a nuanced palate to ensure that the sauce strikes the right chord. For those new to crafting their own barbecue sauces, experimenting with different seasonings in small increments and tasting along the way can help in mastering the art of flavour harmonisation. With practice and patience, even novice cooks can gradually develop the skills needed to create a personalised BBQ sauce that hits all the right notes.